
Pellet Stoves
How Does a Wood Pellet Grill Work?
Did you know that the demand for wood pellet grills has significantly increased, leading to over 1 million units being sold in just 2020?
As an avid grilling enthusiast, I’m here to share with you the inner workings of these innovative cooking machines.
In this article, we’ll delve into the basics of how a wood pellet grill works, including the heating mechanism, the role of wood pellets, temperature and smoke control, and various cooking techniques.
So, let’s fire up the grill and explore the delicious possibilities together!
Key Takeaways
- Wood pellet grills use wood pellets as fuel for cooking and offer precise temperature control for optimal grilling results.
- The heating mechanism involves controlled burning of wood pellets for heat, with heat distribution achieved through fans or convection systems.
- Temperature control knobs allow for precise adjustments of the cooking temperature, and different types of wood pellets create unique flavor profiles.
- Wood pellet grills offer versatility in cooking methods, including direct grilling, indirect grilling, smoking, roasting, and baking, allowing for experimentation and creativity in the kitchen.
The Basics of Wood Pellet Grills
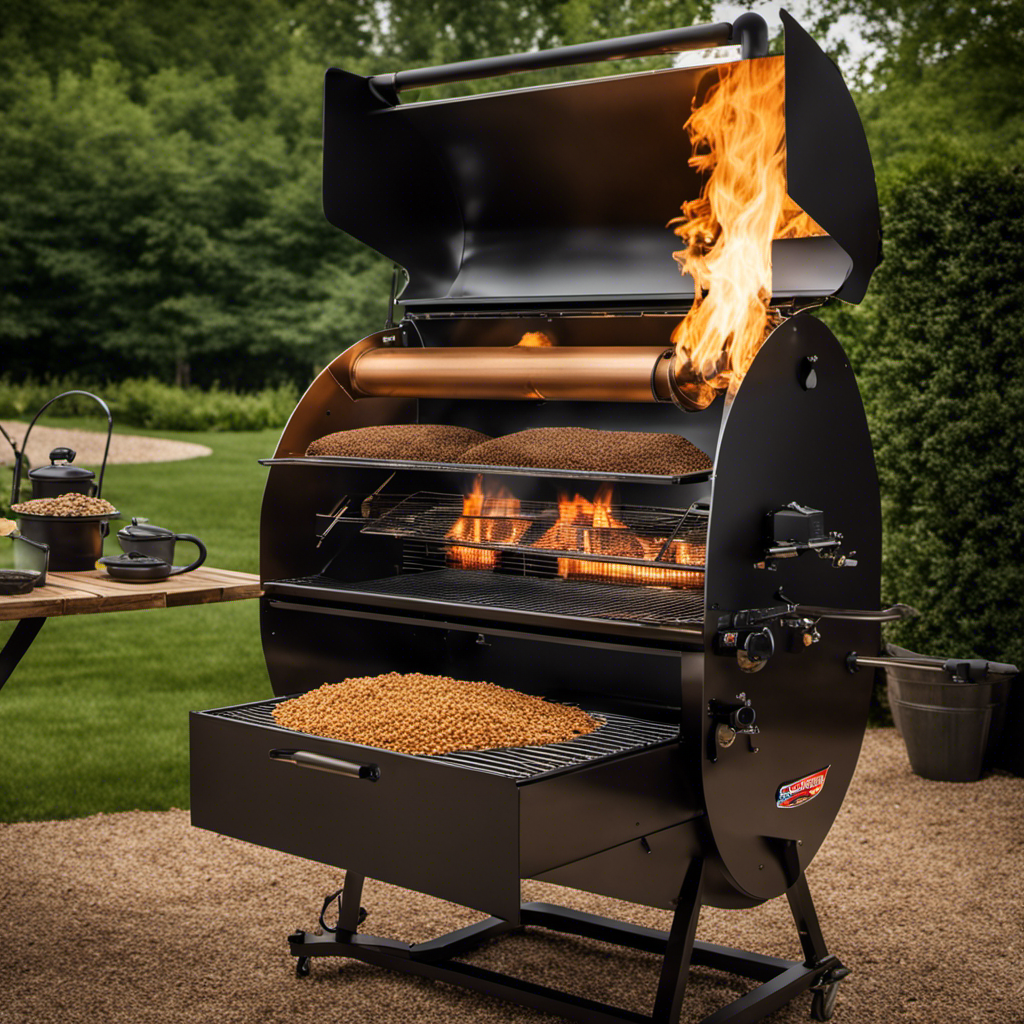
So, you’re probably wondering how a wood pellet grill actually works. Well, let me break it down for you.
Wood pellet grills are equipped with heating elements that are responsible for generating heat and cooking your food. These heating elements are usually located beneath the cooking surface, allowing for even heat distribution and precise temperature control.

Speaking of cooking surface options, wood pellet grills typically come with grates made of stainless steel or cast iron. These materials are known for their durability and heat retention properties, ensuring that your food cooks evenly and retains its natural flavors.
Now, let’s move on to understanding the heating mechanism of these grills, which plays a crucial role in achieving that perfect smoky flavor in your grilled dishes.
Understanding the Heating Mechanism
When it comes to understanding the heating mechanism of wood pellet grills, there are three key points to consider: the pellet combustion process, the heat distribution method, and the temperature control system.
The pellet combustion process involves the controlled burning of wood pellets to generate heat, creating a consistent and flavorful cooking environment.
The heat distribution method utilizes fans or convection systems to evenly distribute the heat throughout the grill, ensuring that your food is cooked to perfection.
Lastly, the temperature control system allows you to adjust and maintain the desired cooking temperature, giving you full control over the grilling process.
Pellet Combustion Process
First, you’ll load hardwood pellets into the hopper of the wood pellet grill. These pellets are made from compressed sawdust and other wood waste materials, making them an eco-friendly choice for fuel. Pellet fuel production involves grinding the raw materials into a fine powder, which is then compressed under high pressure to form the pellets. This process eliminates the need for chemicals or binders, further reducing the environmental impact.
Once the pellets are loaded, they are fed into a combustion chamber by an auger. The grill’s electronic control system regulates the amount of fuel and air flow, ensuring efficient and consistent combustion. As the pellets burn, they release heat and smoke, creating the signature wood-fired flavor. The heat is then circulated throughout the cooking chamber by a convection fan, ensuring even heat distribution and consistent cooking temperatures.
Now, let’s move on to the heat distribution method used in wood pellet grills.
Heat Distribution Method
The heat from the burning pellets is evenly distributed throughout the cooking chamber by a convection fan. This heat distribution method ensures that the food is cooked evenly and thoroughly. The convection fan creates a constant airflow within the grill, allowing for efficient heat transfer.
As the pellets burn, they produce heat, which is then circulated by the convection fan. The airflow dynamics play a crucial role in maintaining a consistent temperature inside the cooking chamber. The hot air is pushed around the food, ensuring that it is cooked from all sides. This method not only results in deliciously cooked meals but also eliminates the need for constant flipping or rotating of the food.
Now, let’s delve into the temperature control system, which allows for precise adjustments to achieve the desired cooking temperature.
Temperature Control System
The temperature control system on the grill allows for precise adjustments to achieve the desired cooking temperature. This system plays a crucial role in ensuring temperature accuracy and fuel consumption. With the ability to control the temperature with precision, you can cook your food to perfection. This means no more undercooked or overcooked meals.
The temperature control system uses advanced technology to regulate the flow of fuel and air into the grill, which directly affects the temperature inside. By adjusting the temperature control knobs, you can increase or decrease the heat, maintaining a consistent temperature throughout the cooking process. This not only ensures that your food cooks evenly but also helps in minimizing fuel consumption.
Now, let’s move on to the importance of wood pellets in the operation of a wood pellet grill.
The Importance of Wood Pellets
To make your wood pellet grill work, you’ll need to understand the importance of wood pellets.
Wood pellets are the fuel source for your grill, providing both heat and flavor to your food. They are made from compressed sawdust and contain no additives or binders, making them a clean and eco-friendly option.
The benefits of using wood pellets in your grill are numerous. Firstly, they offer consistent and reliable heat, allowing for precise temperature control. Secondly, they impart a delicious smoky flavor to your food, enhancing the taste and aroma. Lastly, there are different types of wood pellets available, each with its own unique flavor profile. From hickory and mesquite to apple and cherry, you can experiment with different woods to create a variety of flavors.
Now, let’s delve into the next section, where we will discuss how to control temperature and smoke on your wood pellet grill.
Controlling Temperature and Smoke
Now, let’s dive into how you can control the temperature and smoke on your wood pellet grill. Here are three key ways to achieve the perfect cooking environment:
-
Controlling Airflow: Adjusting the airflow on your wood pellet grill is crucial for temperature control. By opening or closing the vents, you can increase or decrease the amount of oxygen that reaches the fire, ultimately affecting the heat produced.
-
Smoke Flavor Profiles: The wood pellets you choose will greatly impact the flavor of your food. Different wood varieties, such as hickory, mesquite, or apple, create unique smoke flavor profiles. Experimenting with different combinations can elevate your dishes to new levels of deliciousness.
-
Placement of Meat: The position of your meat on the grill grates can also influence the smoke flavor. Placing it closer to the fire will result in a stronger smoky taste, while positioning it further away will produce a milder flavor.
By mastering these techniques, you can create mouthwatering dishes with precise temperature control and delightful smoke flavors.
Now, let’s explore the various cooking techniques on a wood pellet grill.
Cooking Techniques on a Wood Pellet Grill
By experimenting with different cooking techniques, you can elevate your dishes to new levels of deliciousness on a wood pellet grill. Wood pellet grills offer versatility when it comes to cooking methods, allowing you to achieve various flavors and textures.
One popular technique is direct grilling, where you cook your food directly over the heat source. This method is perfect for steaks, burgers, and vegetables, giving them a beautiful sear and caramelization.
Another technique is indirect grilling, where you cook your food away from the heat source. This method is great for larger cuts of meat, such as roasts or whole chickens, as it ensures even cooking and tenderness.
You can also enhance the flavor of your dishes by using wood pellets that complement your ingredients. Hickory for a smoky taste, apple for a touch of sweetness, or mesquite for a bold and robust flavor.
By mastering these cooking methods and experimenting with different wood pellets, you can take your dishes to the next level of flavor enhancement.
As you explore the delicious possibilities of cooking on a wood pellet grill, it’s important to remember that regular maintenance and cleaning are essential to keep your grill in top condition.
Maintenance and Cleaning Tips for Wood Pellet Grills
Regular maintenance and cleaning are crucial for keeping your wood pellet grill in optimal condition. To ensure that your grill continues to perform at its best, here are some maintenance tips and cleaning techniques you can follow.
First, always clean the grill grates after each use to remove any residual food and grease. Use a grill brush to scrub away any stuck-on debris.
Next, regularly inspect the fire pot and clean out any ash or pellet buildup. This will help prevent clogs and ensure proper airflow.
Additionally, check the heat diffuser and drip tray for grease buildup and clean them as needed.
Finally, don’t forget to clean the exterior of the grill with warm soapy water and a soft sponge.
Can the Same Type of Wood Pellets be Used in a Wood Pellet Grill and Stove?
Yes, the same type of wood pellets can be used in a wood pellet grill and stove. This is because the wood pellet stove workings are designed to accommodate a variety of wood pellets, allowing them to be used interchangeably in both appliances.
Are the Mechanisms of a Wood Pellet Grill Similar to Those of a Wood Pellet Stove?
Yes, the mechanisms of a wood pellet grill are similar to those of a wood pellet stove operation. Both use wood pellets as fuel to generate heat for cooking or heating. The pellets are fed into a hopper, then transferred to a fire pot where they are ignited to produce consistent heat.
Frequently Asked Questions
Are Wood Pellet Grills Suitable for Both Indoor and Outdoor Use?
Yes, wood pellet grills are suitable for both indoor and outdoor use. However, there are pros and cons to consider. Indoor grilling offers convenience and safety, while outdoor grilling allows for a traditional BBQ experience. Safety considerations and the use of accessories are important in both settings.
Can Wood Pellet Grills Be Used for Grilling and Smoking at the Same Time?
Yes, wood pellet grills can be used for grilling and smoking at the same time. It’s a versatile cooking method that allows for precise temperature control, giving you the best of both worlds.
How Long Do Wood Pellets Typically Last Before Needing to Be Refilled?
On average, wood pellets typically last between 4 to 6 hours before needing to be refilled. However, the burn time can be affected by factors such as temperature, cooking duration, and pellet quality.
Can Wood Pellet Grills Reach High Temperatures for Searing?
Yes, wood pellet grills can reach high temperatures for searing. The combination of wood pellets and airflow allows for precise temperature control, making them versatile for both low and slow cooking and high-heat searing.
Are Wood Pellet Grills Compatible With Different Types of Wood Pellets?
Yes, wood pellet grills are compatible with different types of wood pellets. The pros of using different types of wood pellets include diverse flavors, while the cons include potential ash buildup and cost variations.
Conclusion
In conclusion, using a wood pellet grill is like having a master chef by your side, effortlessly creating mouthwatering dishes.
The heating mechanism, fueled by wood pellets, ensures consistent and precise temperature control, allowing for even cooking and perfect results every time.
Just like a conductor leading an orchestra, you have complete control over the temperature and smoke levels, giving you the ability to create a symphony of flavors.
With proper maintenance and cleaning, your wood pellet grill will continue to be your culinary companion, bringing joy and delicious meals for years to come.

Terra grew up with a soul deeply connected to nature. Her earliest memories are of sun-drenched meadows, whispering woods, and the rhythmic dance of waves on a moonlit night. Every gust of wind, rustling leaf, and distant horizon beckoned her with tales waiting to be told.

I would like to confirm that while it may be difficult to secure the funding needed for a wood pellet stove, it is definitely worth it. With energy costs increasing and the demand for sustainable heating options growing, opting to purchase a wood pellet stove for your home is a wise choice.
In this article, I’ll break down all the different financing options available to you, from traditional methods to government assistance programs and even manufacturer financing plans. So, let’s dive in and explore how you can make your dream of owning a wood pellet stove a reality.
Key Takeaways
- Wood pellet stoves can be cost-effective and environmentally friendly compared to other fuel sources.
- Government grants and tax incentives can help offset the cost of purchasing and installing a wood pellet stove.
- Traditional financing methods such as loans from financial institutions are available, and interest rates vary based on credit score and loan length.
- Home equity loans and lines of credit can provide convenient access to funds for financing a wood pellet stove, but it’s important to carefully consider the terms and interest rates associated with these loans.
Understanding the Cost
You’ll need to understand the cost of a wood pellet stove before deciding how to finance it. When exploring installation costs, it’s important to consider factors such as the size of your space and the complexity of the installation process. The cost can vary depending on whether you choose a freestanding stove or a fireplace insert.
Additionally, comparing fuel types is crucial in determining the long-term expenses. Wood pellets are often more cost-effective compared to other fuel sources like propane or natural gas. They are also considered environmentally friendly due to their low emissions and renewable nature.
Understanding these costs and fuel options will help you make an informed decision when exploring financing options for your wood pellet stove. Now, let’s delve into the various financing options available to you.
Exploring Financing Options
There’s a variety of financing options available to help you purchase a wood pellet stove. If you’re looking for assistance from the government, you might be eligible for government grants specifically aimed at promoting energy efficiency and renewable energy sources. These grants can help offset the cost of purchasing and installing a wood pellet stove.
Another option to consider is crowdfunding. Crowdfunding platforms allow individuals to raise money for various projects, including home improvements. By creating a campaign and sharing it with friends, family, and the online community, you can gather funds to help finance your wood pellet stove.
These options provide alternative ways to finance your purchase and make the cost more manageable. However, if these options don’t suit your needs, there are also traditional financing methods available.
Traditional Financing Methods
If you’re not interested in government grants or crowdfunding, another option to consider is obtaining a loan from a financial institution. This can be a good choice for individuals who have a strong credit history and are comfortable with the idea of taking on debt.
When exploring traditional financing methods, it’s important to understand interest rates and their impact on your overall cost. Here are a few things to keep in mind:
- Interest rates can vary depending on factors such as your credit score and the length of the loan.
- A higher credit score can result in a lower interest rate, saving you money in the long run.
- It’s essential to compare loan offers from different financial institutions to ensure you’re getting the best rate possible.
Now, let’s move on to discussing government assistance programs that may be available to help finance your wood pellet stove purchase without relying on loans.
Government Assistance Programs
Government assistance programs can provide financial support for individuals looking to purchase a wood pellet stove. These programs, such as government grants and tax incentives, aim to promote energy efficiency and reduce reliance on traditional heating methods.
Government grants can offer a significant amount of money towards the purchase and installation of a wood pellet stove, helping to offset the initial cost. Additionally, tax incentives allow individuals to deduct a portion of the stove’s cost from their annual taxes, providing further financial relief. These programs not only make wood pellet stoves more affordable, but also encourage the use of clean and renewable energy sources.
Transitioning to the subsequent section about energy efficiency grants, another avenue of financial support for individuals seeking to improve their home’s energy efficiency is available.
Energy Efficiency Grants
You can apply for energy efficiency grants to receive financial assistance for improving your home’s energy efficiency. These grants are a great way to offset the costs of implementing energy-efficient upgrades, such as installing a wood pellet stove. By taking advantage of these incentives, you can not only reduce your carbon footprint but also save money on your energy bills in the long run.
Here is a table outlining some popular energy efficiency grants and renewable energy grants that you can explore:
| Grant Name | Description |
|---|---|
| Energy Efficiency Incentives | Financial incentives for energy-efficient upgrades to homes and buildings. |
| Renewable Energy Grants | Grants for the installation of renewable energy systems, such as solar panels or wind turbines. |
| Weatherization Assistance Program | Assistance for low-income households to improve energy efficiency and reduce energy costs. |
| Residential Energy Efficiency Rebates | Rebates for energy-efficient appliances and equipment in residential settings. |
| Green Building Grants | Grants for the construction or renovation of energy-efficient and sustainable buildings. |
Now, let’s discuss how you can further finance your wood pellet stove installation through home equity loans and lines of credit.
Home Equity Loans and Lines of Credit
When it comes to financing the purchase of a stove, one option to consider is borrowing against your home equity.
Home equity loans and lines of credit can provide homeowners with a convenient and flexible way to access funds for home improvement projects, such as buying a stove.
These financing options allow you to tap into the value of your home and use that equity to secure a loan or line of credit, which can be used to finance the purchase and installation of a new stove.
Borrowing Against Home Equity
One option for financing a wood pellet stove is to borrow against your home equity. This can be done through a home equity loan or a home equity line of credit. These types of loans allow you to borrow against the value of your home, using it as collateral. This means that if you default on the loan, the lender can potentially foreclose on your property.
It’s important to carefully consider the terms and interest rates associated with these loans, as they can vary depending on your creditworthiness and the current market conditions. Additionally, it’s worth exploring other options such as borrowing against retirement savings or considering peer-to-peer lending platforms. These alternatives may offer different terms and rates that could better suit your financial situation.
Moving on to other financing options for stoves…
Financing Options for Stoves
There are various ways to finance the purchase of a stove, including borrowing against your home equity. When considering financing options for stoves, it is important to understand interest rates and compare loan terms.
Interest rates can significantly impact the total cost of financing, so it’s crucial to shop around and find the best rate available. Additionally, comparing loan terms allows you to evaluate the length of the loan, monthly payment amounts, and any additional fees or penalties.
By carefully considering these factors, you can make an informed decision about the financing option that best suits your needs and budget.
Now, let’s explore another financing option for purchasing a wood pellet stove: manufacturer financing plans.
Manufacturer Financing Plans
Manufacturer financing plans offer a convenient way to finance a wood pellet stove. These plans are designed to help homeowners afford the upfront cost of a stove by spreading payments over a set period. With manufacturer financing options, you can enjoy the benefits of a wood pellet stove without breaking the bank. In addition to these plans, there are alternative financing methods available that can also make owning a wood pellet stove more accessible. Here is a table comparing the different financing options:
Financing Options Pros Cons Manufacturer Financing Convenient repayment terms Higher interest rates Personal Loans Lower interest rates May require good credit Home Equity Loan Tax-deductible interest Tied to your home’s equity Credit Cards Instant access to funds High interest rates and fees Lease-to-Own Options Flexible payment options Higher overall cost in the long run
Now, let’s explore the lease-to-own options for financing a wood pellet stove.
Lease-to-Own Options
Leasing can offer several benefits when it comes to acquiring a product like a wood pellet stove.
One of the main advantages is the payment flexibility options that leasing provides. This allows me to choose a payment plan that best fits my budget and financial situation.
Additionally, at the end of the lease term, I have the option to own the wood pellet stove, providing me with a sense of ownership and the opportunity to continue enjoying its benefits for years to come.
Benefits of Leasing
One of the benefits of leasing a wood pellet stove is the flexibility it offers in terms of payment options. Leasing allows you to enjoy the advantages of owning a wood pellet stove without the large upfront cost. Instead of purchasing the stove outright, you can make monthly lease payments, which are typically more affordable and manageable for most people.
Leasing also allows you to upgrade your stove easily when newer models become available, ensuring that you always have access to the latest technology. Additionally, leasing provides the benefit of not having to worry about maintenance and repairs, as these are often included in the lease agreement.
Payment Flexibility Options
When it comes to payment flexibility options for a wood pellet stove lease, there are several choices available to suit different budget needs.
At [Company Name], we understand the importance of offering flexible payment terms to make it easier for our customers to finance their wood pellet stoves. We offer a range of financing options with different terms and conditions to accommodate various financial situations.
Whether you prefer shorter-term financing with higher monthly payments or longer-term financing with lower monthly payments, we have options to fit your needs. Our goal is to make it as convenient as possible for you to enjoy the benefits of a wood pellet stove without breaking the bank.
Speaking of financing terms and conditions, let’s now discuss what happens with ownership after the lease period ends.
Ownership After Lease
After the lease period ends, you’ll have the option to purchase the stove or return it.
When it comes to ownership transfer, it’s important to understand your post lease responsibilities. Here are a few key things to keep in mind:
- If you decide to purchase the stove, you will be responsible for any maintenance and repairs.
- Before transferring ownership, make sure to thoroughly inspect the stove for any damages.
- It’s also a good idea to check if there are any warranties or service agreements that can be transferred to you.
Considering the ownership transfer and post lease responsibilities, it’s important to plan ahead for financing options. One common way to finance a wood pellet stove is through personal loans and credit cards. These options allow you to spread out the cost over time, making it more manageable.
Personal Loans and Credit Cards
If you’re considering financing a wood pellet stove, personal loans and credit cards are two options to explore.
Personal loans are a popular choice for larger purchases, as they offer fixed interest rates and predictable monthly payments. Many lenders offer personal loans specifically for home improvement projects, making it easier to secure financing for a wood pellet stove.
On the other hand, credit card financing can be a convenient option for smaller purchases. It allows you to spread out the cost over time, but keep in mind that interest rates on credit cards can be high.
Whichever option you choose, it’s important to carefully consider your financial situation and compare interest rates and terms to ensure you are getting the best deal.
Planning for the future, there are additional financing options to consider.
Planning for the Future
When it comes to planning for the future, two key points to consider are saving for expenses and setting long-term financial goals.
Saving for expenses involves setting aside money for various needs such as emergencies, vacations, and major purchases.
On the other hand, long-term financial goals can include saving for retirement, buying a house, or funding a child’s education.
Saving for Expenses
Saving money can help you finance a wood pellet stove. It may seem daunting to come up with the funds for such a purchase, but with the right saving strategies and budgeting techniques, it is achievable.
Here are some tips to help you save effectively:
-
Create a budget: Track your expenses and prioritize your spending to identify areas where you can cut back.
-
Set savings goals: Determine how much you need to save and create a plan to reach your target within a specific timeframe.
-
Automate savings: Set up automatic transfers to a separate savings account to ensure you consistently put money aside.
-
Reduce unnecessary expenses: Cut back on dining out, entertainment, and other non-essential purchases to free up more funds.
-
Increase your income: Consider taking on a part-time job or freelancing to boost your earnings.
By implementing these saving strategies and budgeting techniques, you can make progress towards financing a wood pellet stove.
Planning for your long-term financial goals is essential for a secure future.
Long-Term Financial Goals
To achieve your long-term financial goals, it’s important to create a plan and stick to it.
Long-term financial planning is essential for securing a comfortable retirement. It involves setting goals, creating a budget, and regularly saving for the future.
One of the key aspects of long-term financial planning is retirement savings. It’s crucial to start saving early and consistently contribute to your retirement accounts. Whether it’s through employer-sponsored plans like a 401(k) or individual retirement accounts (IRAs), saving for retirement ensures financial security in your golden years.
By investing in a diversified portfolio and regularly reviewing and adjusting your savings strategy, you can maximize your retirement savings and achieve your long-term financial goals.
– Can I Use Financing Options to Purchase a Pellet Stove and Save on Heating Bills?
Yes, financing options can help you purchase a pellet stove and cut heating bills in half. By opting for a pellet stove, you can significantly reduce your heating costs and enjoy a more efficient and sustainable heating solution for your home.
What Financing Options Are Available for Purchasing a Wood Pellet Stove?
When considering purchasing a wood pellet stove, it’s important to explore your financing options. Many companies offer low-interest financing or payment plans to help make the investment more manageable. By exploring these options, you can cut heating bills in half with a pellet stove without breaking the bank.
Frequently Asked Questions
Can I Use a Personal Loan or Credit Card to Finance a Wood Pellet Stove?
Yes, you can use personal loan options or credit card financing to finance a wood pellet stove. These options allow you to spread out the cost over time and make it more manageable.
Are There Any Government Assistance Programs Specifically for Wood Pellet Stove Financing?
There are government assistance programs available for wood pellet stove financing. These programs can provide financial support and help make the cost more manageable. It’s worth exploring these options to see if you qualify.
What Are Some Alternative Financing Options for Those Who Do Not Qualify for Traditional Financing Methods?
Unconventional financing options for wood pellet stoves can be a lifesaver if traditional methods don’t work. Crowdfunding platforms are a great way to rally support and raise funds for your eco-friendly heating solution.
Can I Lease a Wood Pellet Stove and Eventually Own It?
Leasing options for wood pellet stoves allow you to enjoy the benefits of ownership without the upfront costs. Eventually, you can own the stove by fulfilling the lease agreement. It’s a convenient way to finance a wood pellet stove.
Are There Any Energy Efficiency Grants Available for Wood Pellet Stove Installations?
Energy efficiency grants and tax incentives are great options for financing wood pellet stove installations. These programs provide financial support to homeowners looking to improve energy efficiency in their homes and reduce their carbon footprint.
Conclusion
In conclusion, financing a wood pellet stove can be a wise investment in both financial and environmental terms.
By understanding the cost and exploring various financing options, such as government assistance programs and manufacturer financing plans, individuals can make their dream of owning a wood pellet stove a reality.
With the help of energy efficiency grants, lease-to-own options, personal loans, and credit cards, the path to a warm and cozy home becomes more attainable.
So, let’s embrace the warmth and sustainability symbolized by a wood pellet stove and plan for a greener future.

Growing up surrounded by the vast beauty of nature, Sierra was always drawn to the call of the wild. While others sought the comfort of the familiar, she ventured out, embracing the unpredictable and finding stories in the heartbeat of nature.
At the epicenter of every remarkable venture lies a dynamic team—a fusion of diverse talents, visions, and passions. The essence of Best Small Wood Stoves is crafted and refined by such a trio: Sierra, Logan, and Terra. Their collective expertise has transformed the platform into a leading authority on small wood stoves, radiating warmth and knowledge in equal measure.

Looking at the pile of wood pellets in front of me, I can’t help but wonder: what criteria should I use to evaluate the quality of this fuel? With numerous choices on the market, it is essential to understand the key features to consider.
In this article, I will guide you through the process of assessing wood pellet fuel quality. From the physical appearance to the ash and moisture content, heat output, and pellet durability, we will leave no stone unturned.
So, let’s dive in and unravel the secrets to identifying top-notch wood pellet fuel.
Key Takeaways
- Dust-free and uniform appearance indicate high quality wood pellet fuel.
- Low ash content leads to efficient burning, higher heat output, and reduced environmental impact.
- Proper moisture content of 6-8% is essential for optimal burning efficiency.
- High-quality pellets have high durability, resist breaking and crumbling, and have low carbon emissions during combustion.
Physical Appearance
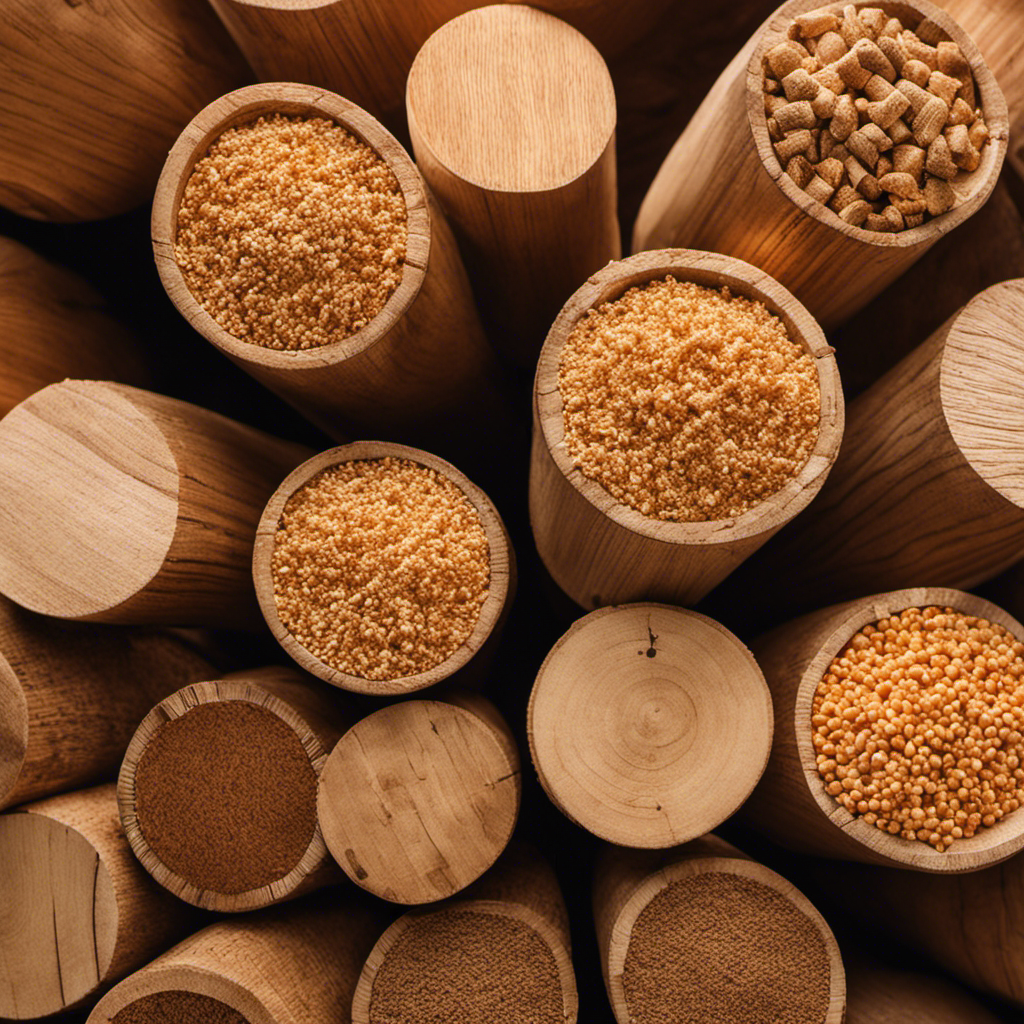
When assessing the quality of wood pellet fuel, you should examine its physical appearance to ensure it is free from dust and has a uniform shape and color. Color variations can indicate inconsistencies in the manufacturing process, which may affect the fuel’s combustion efficiency.
A thorough texture analysis is also crucial. The pellets should have a dense and compact structure, without any visible cracks or breaks. This ensures that the pellets will burn efficiently and produce consistent heat output. Additionally, the texture should be smooth and uniform, without any rough edges or irregularities.
By carefully inspecting the physical appearance of the wood pellet fuel, you can determine its overall quality and performance.
Now, let’s move on to discussing the ash content and its importance in assessing the quality of wood pellet fuel.
Ash Content
To determine the ash content of wood pellet fuel, check the amount of residue left behind after combustion. The ash content is an important factor in evaluating the quality of wood pellets because it affects combustion efficiency and environmental impact. Here are three key points to consider:
-
Combustion efficiency: High-quality wood pellets have low ash content, which means less residue is produced during combustion. This leads to more efficient burning and higher heat output.
-
Environmental impact: Wood pellets with low ash content have a lower environmental impact. They produce less particulate matter and emissions, reducing air pollution and contributing to cleaner air quality.
-
Ash disposal: Low ash content also means less ash residue to dispose of after combustion. This simplifies the clean-up process and reduces the frequency of ash removal, making wood pellet fuel a convenient and low-maintenance option.
Considering the ash content is an essential step in assessing the quality of wood pellet fuel. The next aspect to examine is the moisture content.
Moisture Content
Check the moisture content of your wood pellets to ensure optimal burning efficiency and performance. Proper storage of wood pellets is essential to maintaining their moisture content. Wood pellets should be stored in a dry and well-ventilated area to prevent moisture absorption.
High moisture content in wood pellets can lead to poor combustion, reduced heat output, and increased emissions. Moisture content is typically measured using a moisture meter, which provides an accurate reading of the amount of water present in the pellets. It is recommended to aim for a moisture content of around 6-8% for optimal burning efficiency.
Heat Output
Keep in mind that high moisture content in your wood pellets can result in reduced heat output and inefficient burning. To ensure optimal heat output and combustion efficiency, here are four factors to consider when evaluating the quality of wood pellet fuel:
-
Low Moisture Content: Look for pellets with a moisture content below 10%. High moisture levels can lead to incomplete combustion and decreased heat output.
-
Density: The density of the pellets affects their burn time and heat output. Higher density pellets provide longer burn times and more consistent heat.
-
Ash Content: Lower ash content means less residue and more efficient burning. Look for pellets with ash content below 1%.
-
Carbon Emissions: High-quality pellets produce lower carbon emissions, making them more environmentally friendly and reducing air pollution.
Now, let’s move on to pellet durability, which is another important aspect to consider when assessing wood pellet fuel quality.
Pellet Durability
When evaluating the durability of pellets, it’s important to consider their resistance to breaking and crumbling. High-quality wood pellet fuel should be able to withstand handling and transportation without easily breaking apart. This can be determined by observing the pellets for any signs of damage or crumbling.
Additionally, the storage requirements of wood pellets should be taken into consideration. Proper storage conditions, such as keeping the pellets in a dry and ventilated area, can help maintain their durability over time.
Furthermore, it is crucial to consider the environmental impact of wood pellets. Sustainable sourcing and production methods, as well as low emissions during combustion, are indicators of environmentally friendly pellets.
What are the indicators of high-quality wood pellet fuel?
High quality wood pellet characteristics include low moisture content, uniform size and shape, low ash content, and high heating value. These indicators indicate the fuel’s efficiency, cleanliness, and energy output. When buying wood pellet fuel, be sure to look for these characteristics to ensure a high-quality product.
What Are the Indicators of Quality Wood Pellet Fuel?
The indicators of telling high quality wood pellets include a low moisture content, consistent pellet length and density, minimal ash production, and a clean, light-colored appearance. These factors help ensure efficient, clean-burning fuel for your pellet stove or boiler, making for a more environmentally friendly heat source.
Frequently Asked Questions
How Long Can Wood Pellet Fuel Be Stored Before It Starts to Degrade in Quality?
Wood pellet fuel can degrade in quality if stored for too long. The storage time before degradation varies, but generally, it is recommended to use the fuel within one year to ensure optimal quality and performance.
What Is the Average Cost of Wood Pellet Fuel Compared to Other Types of Fuels?
The average cost of wood pellet fuel compared to other fuels can vary depending on factors such as location, demand, and availability. It’s important to consider these factors when determining the cost of wood pellet fuel.
Are There Any Specific Storage Requirements for Wood Pellet Fuel to Maintain Its Quality?
To maintain the quality of wood pellet fuel, proper storage requirements are crucial. Factors such as moisture content, temperature, and exposure to sunlight can impact its quality.
Can Wood Pellet Fuel Be Used in All Types of Wood Pellet Stoves and Boilers?
Wood pellet fuel can be used in different types of wood pellet stoves and boilers. However, it’s important to check the compatibility of the fuel with your specific appliance to ensure optimal performance.
Are There Any Environmental Benefits of Using Wood Pellet Fuel Compared to Other Fossil Fuels?
There are several ways to determine the quality of wood pellet fuel, such as inspecting for low ash content and uniform size. These factors contribute to its environmental benefits and make it a renewable energy source.
Conclusion
In conclusion, when it comes to determining the quality of wood pellet fuel, it is crucial to consider various factors. By carefully examining the physical appearance, ash content, moisture content, heat output, and pellet durability, one can gain valuable insights into the overall quality of the pellets.
This evaluation process is akin to peering through a magnifying glass, uncovering hidden details and ensuring that only the best fuel is chosen for optimal performance. Just like a discerning detective, it is important to investigate every aspect to guarantee a superior wood pellet fuel experience.
Terra grew up with a soul deeply connected to nature. Her earliest memories are of sun-drenched meadows, whispering woods, and the rhythmic dance of waves on a moonlit night. Every gust of wind, rustling leaf, and distant horizon beckoned her with tales waiting to be told.
Standing in front of my wood pellet BBQ, the air is filled with the delightful smell of smoky scents.
But have you ever wondered how these wood pellets are made? Join me on a journey through the intricate process of transforming wood into BBQ-ready pellets.
From harvesting and processing the wood to the crucial role of heat and pressure, we’ll explore the key ingredients and quality control measures that ensure the perfect pellet for your grilling adventures.
Get ready to uncover the secrets behind the magic of wood pellet BBQs.
Key Takeaways
- Wood pellets provide consistent and flavorful fuel for wood pellet BBQs.
- The tree selection and harvesting process is crucial for high-quality wood pellet production.
- Specialized wood chipping and drying techniques are used to prepare the raw material for pellet manufacturing.
- The pellet manufacturing process involves compressing and extruding dried wood fibers into high-quality pellets.
The Importance of Wood Pellets in Wood Pellet Bbqs
Wood pellets are essential for wood pellet BBQs because they provide a consistent and flavorful fuel source. The importance of wood pellet flavor cannot be overstated when it comes to achieving that authentic smoky taste in your BBQ dishes.
Unlike other fuel sources, such as charcoal or gas, wood pellets infuse a rich and distinct flavor into the food. This is because wood pellets are made from compressed sawdust, which retains the natural oils and aromas of the wood.
The benefits of using wood pellets in BBQ cooking go beyond just flavor. Wood pellets burn efficiently, producing a steady and consistent heat that is ideal for slow cooking and smoking. Additionally, wood pellets are environmentally friendly, as they are made from renewable resources and emit fewer pollutants compared to other fuel sources.
Transitioning into the subsequent section about the steps to harvesting and processing wood for pellet production, it is important to understand the meticulous process involved in creating these high-quality wood pellets.
Steps to Harvesting and Processing Wood for Pellet Production
When it comes to producing high-quality wood pellets, the tree selection process plays a crucial role. It involves carefully choosing the right type of trees that are suitable for pellet production, considering factors such as wood density, moisture content, and heat value.
Additionally, wood chipping techniques are essential in creating uniform and consistent wood chips that can be efficiently processed into pellets.
Lastly, understanding the pellet manufacturing methods is essential, as it involves transforming the wood chips into compact and dense pellets through processes like drying, grinding, and compressing.
Tree Selection Process
To ensure the quality of your wood pellets for your BBQ, you’ll want to carefully select the trees that are used in the manufacturing process. Here are three important considerations when choosing trees for wood pellet production:
-
Tree planting techniques: It is crucial to use appropriate planting techniques to ensure the healthy growth of trees. This includes selecting the right tree species based on climate and soil conditions, proper spacing between trees, and adequate watering and fertilization.
-
Environmental impact assessment: Before harvesting trees for pellet production, an environmental impact assessment should be conducted. This assessment evaluates the potential effects on the ecosystem, including air and water quality, wildlife habitat, and soil erosion. It helps ensure sustainable practices are followed and minimize any negative impacts.
-
Tree selection criteria: When selecting trees, certain characteristics are preferred. Trees that have reached optimal maturity and have a high density of cellulose and lignin are ideal for producing high-quality wood pellets. Additionally, trees that are straight and have minimal branches are easier to process into pellets.
By carefully considering these factors, you can ensure that the trees used in the manufacturing process result in top-notch wood pellets for your BBQ.
In the next section, we will delve into the wood chipping techniques used to prepare the selected trees for pellet production.
Wood Chipping Techniques
By using specialized equipment, the selected trees are chipped into small pieces for easier processing into high-quality wood pellets.
Wood chip suppliers play a crucial role in providing the necessary raw material for pellet production. These suppliers carefully select trees that are suitable for chipping, ensuring that they are free from diseases, rot, or other contaminants.
Once the trees have been harvested, they are transported to the wood chip storage area, where they are stored in large piles or silos. These storage facilities protect the wood chips from moisture and maintain their quality.
The wood chips are then fed into the chipping machine, which uses sharp blades to cut them into smaller, uniform pieces. This process increases the surface area of the chips, making them easier to dry and compress.
The chipped wood is now ready for further processing in the pellet manufacturing methods, where it will be transformed into high-quality wood pellets.
Pellet Manufacturing Methods
Once the wood chips are chipped into small pieces, they can be processed into high-quality wood pellets using specialized methods.
Wood pellets are known for their consistent size, high energy density, and low moisture content, making them ideal for use as fuel in wood pellet BBQs.
To manufacture wood pellets, the chipped wood is first dried to reduce its moisture content. Then, it is fed into a pellet mill, where it undergoes compression and extrusion to form cylindrical pellets.
The pellet production equipment typically includes a hammer mill, dryer, pellet mill, and cooler. These machines work together to transform the chipped wood into uniform pellets with specific properties.
The process of turning wood into pellets for BBQ use requires careful attention to detail and adherence to strict quality control standards.
The Process of Turning Wood Into Pellets for Bbq Use
When it comes to wood pellet production for BBQ use, there are several key points to consider.
First, understanding the process of wood pellet production is crucial in order to appreciate the quality and efficiency of the pellets.
Second, BBQ pellet manufacturing involves specific considerations to ensure the pellets are suitable for use in barbecues.
Lastly, the pellet-making process itself involves several steps, including grinding, drying, and compressing the wood fibers into pellets.
Wood Pellet Production?
To understand how wood pellets are made for wood pellet BBQs, you can start by learning about the process of wood pellet production. This process involves several steps that ensure the high quality of the pellets used for BBQs. Here are some key points to consider:
- Raw Materials: Wood pellets are typically made from sawdust or other wood waste materials obtained from sustainable sources.
- Grinding: The raw materials are first ground into a fine powder to increase their surface area and facilitate the subsequent steps.
- Drying: The powdered wood is then dried to reduce its moisture content, making it easier to compress into pellets.
- Pelletizing: The dried wood powder is compressed under high pressure to form small cylindrical pellets.
- Cooling and Packaging: The newly formed pellets are cooled and then packaged for distribution to wood pellet suppliers.
BBQ Pellet Manufacturing?
In the previous subtopic, we discussed the production of wood pellets. Now, let’s delve into the specifics of BBQ pellet manufacturing.
When it comes to BBQ pellet suppliers, it is crucial to choose reliable and reputable sources. These suppliers offer a wide range of wood pellets specifically designed for use in BBQs.
Using wood pellets for BBQs has several benefits. Firstly, they provide a consistent and even heat, allowing for precise temperature control. This ensures that your food is cooked to perfection every time. Secondly, wood pellets impart a delicious smoky flavor to your dishes, enhancing the overall taste experience. Additionally, wood pellets are made from natural, renewable materials, making them an environmentally friendly choice.
Now, let’s explore the pellet-making process explained in detail.
Pellet-Making Process Explained?
For a better understanding of how the pellet-making process works, let’s take a closer look at how these BBQ essentials are manufactured.
Wood pellets are made from a combination of wood fibers and binders that are compressed under high pressure. Here’s a step-by-step breakdown of the process:
-
Wood selection: High-quality hardwoods like oak, hickory, and cherry are chosen for their superior burning properties and flavor.
-
Grinding: The selected wood is then ground into fine particles to create a consistent texture.
-
Drying: The wood particles are dried to remove any moisture, ensuring a clean and efficient burn.
-
Pellet production: The dried wood particles are mixed with binders and compressed into small cylindrical pellets.
Wood pellet BBQs offer several benefits, including:
-
Consistent heat: Wood pellets provide a steady and controlled heat source, making it easier to cook food evenly.
-
Enhanced flavor: The natural wood composition of pellets infuses a smoky flavor into the food, enhancing the overall taste.
-
Cleaner burning: Wood pellets produce less ash and smoke compared to traditional charcoal, resulting in a cleaner grilling experience.
Now, let’s delve into the key ingredients and additives used in wood pellet manufacturing.
Key Ingredients and Additives in Wood Pellet Manufacturing
When making wood pellets for your wood pellet BBQ, you’ll want to be aware of the key ingredients and additives used in the manufacturing process.
The main ingredient in wood pellets is wood fiber, which can come from various sources such as sawdust, wood chips, and even whole logs. These raw materials are carefully selected to ensure high quality and optimal burning characteristics.
In addition to wood fiber, binders are often used to help hold the pellets together during the manufacturing process. Common binders include corn starch and vegetable oil.
Additives such as lubricants and moisture repellents may also be added to improve the pellet’s performance. These key ingredients and additives play a crucial role in the manufacturing process, ensuring that the wood pellets are of top-notch quality and provide efficient heat when used in your wood pellet BBQ.
As we delve into the role of heat and pressure in wood pellet formation, we will gain further insight into the intricate process of creating these exceptional fuel sources.
The Role of Heat and Pressure in Wood Pellet Formation
In the previous subtopic, I discussed the key ingredients and additives used in the manufacturing of wood pellets for BBQs. Now, let’s delve into the role of heat and pressure in the formation of these pellets.
-
Heat: During the pelletizing process, heat is applied to the raw wood materials, causing the lignin to soften and bind the wood particles together.
-
Pressure: Simultaneously, pressure is exerted on the hot wood particles, compacting them into dense pellets. This pressure helps to further solidify the pellets and enhance their durability.
-
Benefits of using wood pellets in BBQ cooking: The combination of heat and pressure in wood pellet formation leads to several advantages for BBQ cooking. These include:
- Consistent heat: Wood pellets burn evenly, providing a consistent and controlled heat source for grilling or smoking.
- Enhanced flavor: Different types of wood pellets, such as hickory or mesquite, can impart unique flavors to the food, enhancing the taste of your BBQ dishes.
- Reduced ash production: Wood pellets produce less ash compared to traditional charcoal, resulting in easier cleanup after your BBQ session.
Now, let’s move on to the subsequent section, where we will explore the quality control measures in wood pellet production for BBQs.
Quality Control Measures in Wood Pellet Production for Bbq
To ensure the quality of your BBQ wood pellet production, it’s important to implement rigorous control measures throughout the manufacturing process.
Quality control measures play a crucial role in maintaining consistency and ensuring that the final product meets the desired standards.
In the pellet manufacturing process, various steps are taken to achieve this.
Firstly, raw materials are carefully selected to ensure they meet specific criteria, such as moisture content and size.
Then, during the grinding and drying stages, regular checks are carried out to monitor particle size and moisture levels.
The mixing process is also closely monitored to ensure uniform distribution of the ingredients.
Additionally, quality control measures are implemented during the pelletizing and cooling stages to maintain the desired density and prevent any defects.
Frequently Asked Questions
Can Wood Pellets Be Used in Other Types of Grills or Barbecues?
Yes, wood pellets can be used in other types of grills or barbecues, such as wood pellet grills vs. traditional charcoal grills. The benefits of using wood pellets include enhanced flavor and precise temperature control in a barbecue smoker.
Are Wood Pellets Environmentally Friendly?
Wood pellets are environmentally friendly due to their sustainability and low carbon footprint. They are made from compacted sawdust and wood shavings, which are byproducts of the lumber industry, reducing waste and promoting a more sustainable fuel source.
Can Wood Pellets Be Used for Smoking Meats and Vegetables?
Wood pellets for grilling are versatile and offer numerous benefits for smoking meats and vegetables. They provide a consistent source of heat, impart a smoky flavor, and are environmentally friendly.
How Long Do Wood Pellets Typically Last When Used in a Wood Pellet Bbq?
Wood pellets typically last for several hours when used in a wood pellet BBQ. They provide consistent heat and smoke, enhancing the flavor of the food. The longevity and flavor benefits make wood pellets a popular choice for BBQ enthusiasts.
Are There Any Health Concerns Associated With Using Wood Pellets for Bbq?
There are potential health risks associated with using wood pellets for BBQ. It is important to take safety precautions such as using them in a well-ventilated area and avoiding inhalation of the smoke.
Can Different Types of Wood Pellets be Used for Wood Pellet BBQs?
Yes, different types of wood pellets can be used for wood pellet BBQs. The type of wood pellet used can impart different flavors to the food. Some popular options include hickory, apple, cherry, and mesquite. Experiment with different types to find the flavor profile you prefer. Follow these wood pellet usage tips for best results.
Conclusion
In conclusion, wood pellets play a crucial role in achieving that perfect smoky flavor in wood pellet bbqs. The process of making wood pellets involves harvesting and processing wood, followed by the transformation of wood into pellets using heat and pressure.
Quality control measures are implemented to ensure the consistency and effectiveness of the pellets. For example, a case study conducted by a renowned bbq chef showed that using high-quality wood pellets resulted in a more flavorful and evenly cooked meal.
So, choosing the right wood pellets can greatly enhance the bbq experience.
Terra grew up with a soul deeply connected to nature. Her earliest memories are of sun-drenched meadows, whispering woods, and the rhythmic dance of waves on a moonlit night. Every gust of wind, rustling leaf, and distant horizon beckoned her with tales waiting to be told.


-
 Wood Stove3 months ago
How To Build A Thermoelectric Generator For A Wood Stove
-
 Wood Stove4 months ago
How To Use Damper And Draft On Wood Stove
-
 Wood Stove4 months ago
When To Open And Close Damper On Wood Stove
-
 Wood Stove4 months ago
How Far Does Wood Stove Have To Be From Wall
-

 Wood Stove3 months ago
How Does A Circulator Wood Stove Work
-
 Pellet Stoves3 months ago
Why Is My Wood Pellet Stove Putting so Much Soot
-
 Wood Stove4 months ago
What Can I Use As Insulation On Wood Stove Pipes
-
 Pellet Stoves3 months ago
How to Make a Pellet Basket for Wood Burning Stoves