Connect with us

Wood Stove

How To Remove Wood Stove Pipe

Published

on

An image showcasing a step-by-step visual guide on removing a wood stove pipe: a person wearing gloves unscrewing the pipe sections, sliding them apart, and carefully lowering them down, revealing the clear space left behind

Were you aware that by tackling the task of disassembling a wood stove pipe on your own, you can save a significant amount of both time and money?

In this guide, I’ll take you through the step-by-step process of safely removing your wood stove pipe.

From preparing for removal to cleaning and inspecting the pipe, I’ll provide you with all the necessary knowledge and tips to ensure a successful removal.

So, let’s get started and make this task a breeze!

Key Takeaways

  • Have all necessary tools at hand before starting the removal process.
  • Use caution and care to avoid damaging the pipe or surrounding area.
  • Disconnect the pipe from the stove by loosening the metal clamps and gently pulling it away.
  • Clean and inspect the pipe for damage or wear before reusing it.

Preparing for Removal

I’m getting ready to remove the wood stove pipe. Before I begin, I ensure that I’ve all the necessary tools at hand.

First, I locate the pipe brackets that hold the pipe in place. Using a screwdriver, I carefully remove the screws that secure the brackets to the wall or ceiling. It’s important to be cautious while doing this to avoid damaging the pipe or surrounding area.

Advertisement

To protect the area, I place a drop cloth or tarp underneath the pipe to catch any debris that may fall. Once the brackets are removed, I’m ready to disconnect the pipe from the stove, which I’ll explain in the next section.

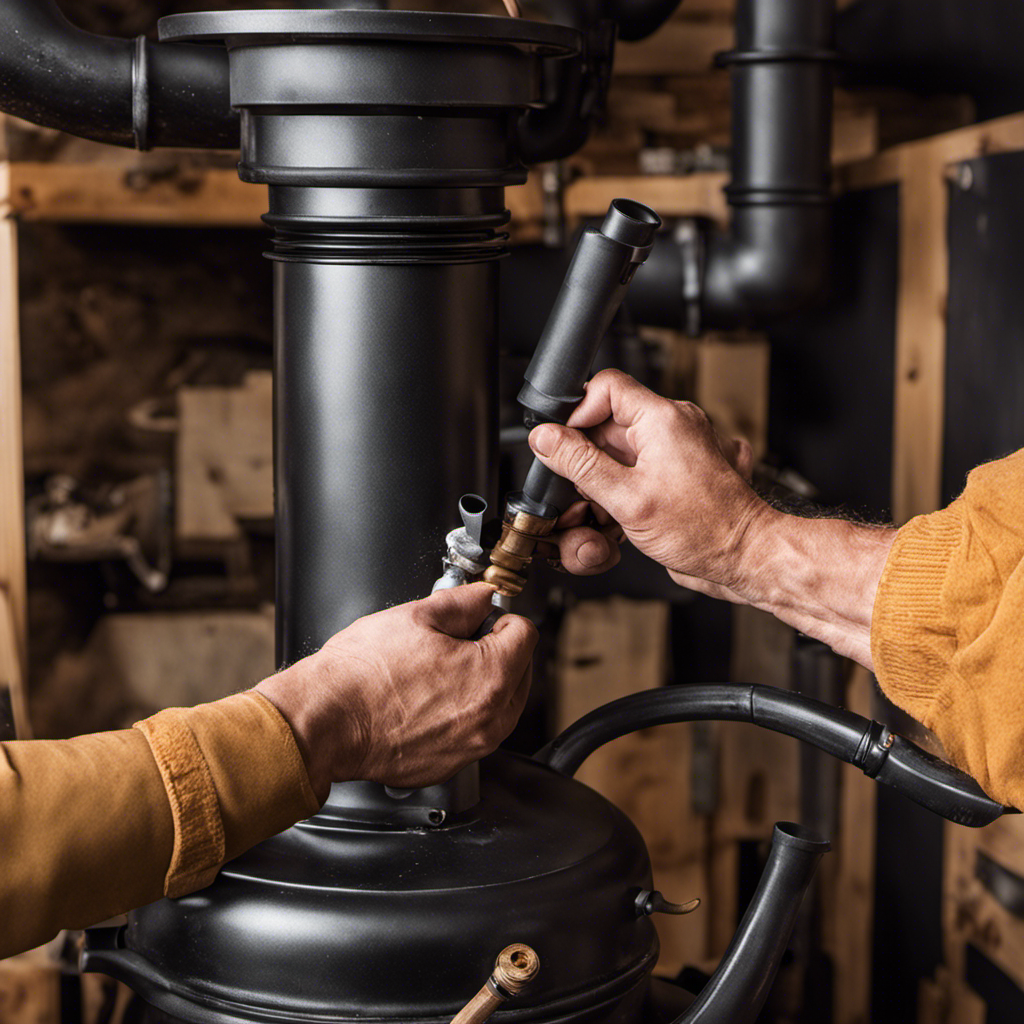
Disconnecting the Pipe From the Stove

To disconnect the pipe from the stove, I’ll twist and loosen the metal clamps securing it in place. These clamps are typically located at the connection points between the stove and the pipe. By twisting them counterclockwise, I can release their grip on the pipe.

Once the clamps are loosened, I can gently pull the pipe away from the stove, being careful not to damage any surrounding components. It’s important to note that when reconnecting the pipe, it’s crucial to ensure a tight and secure fit. This will prevent any leaks or smoke from escaping.

If you encounter any issues during the disconnection process, such as stuck clamps or stubborn connections, troubleshooting common problems can help.

Removing the Pipe Sections

After twisting and loosening the metal clamps, I can easily separate the sections of the pipe. It’s important to remove the pipe sections carefully to avoid any damage or accidents.

Advertisement

Here are some tips for successfully removing wood stove pipe sections:

  • Inspect the pipe for any signs of damage or wear, such as rust or cracks.
  • Ensure that the stove is completely cool before starting the removal process.
  • Use gloves and safety goggles to protect yourself from any sharp edges or debris.
  • Disconnect the pipe sections in a clockwise direction, starting from the top.
  • If you encounter any resistance, gently wiggle the sections back and forth to loosen them.

Cleaning and Inspecting the Pipe

While wearing gloves and safety goggles, I carefully clean and inspect the sections of the pipe for any signs of damage or wear. Proper cleaning techniques are essential to maintain the efficiency and safety of a wood stove pipe.

To begin, I remove any debris or soot buildup using a wire brush or a chimney sweep brush. I make sure to clean both the interior and exterior surfaces of the pipe thoroughly.

Next, I inspect the pipe for any cracks, rust, or other signs of damage. This is important to prevent any potential hazards, such as carbon monoxide leaks. I pay special attention to the joints and seams to ensure they’re secure and in good condition.

Final Steps and Safety Precautions

I carefully check for any loose or damaged connections in order to ensure the safety of the wood stove system. Safety is paramount when removing a wood stove pipe, and it’s crucial to take the necessary precautions to protect yourself and others.

Here are some important steps to follow:

Advertisement
  • Wear safety gear, such as gloves, goggles, and a mask, to protect yourself from dust and debris.
  • Use the appropriate tools, like a screwdriver or wrench, to carefully disconnect the pipe from the stove and chimney.
  • Dispose of the removed wood stove pipe properly by contacting your local waste management facility or recycling center.
  • Clean the area around the pipe to remove any soot or debris.
  • Inspect the pipe for any signs of damage or wear, and make any necessary repairs or replacements before reinstalling.

Frequently Asked Questions

Can I Remove a Wood Stove Pipe on My Own, or Do I Need to Hire a Professional?

I can remove a wood stove pipe on my own, but hiring a professional is recommended. It ensures safety and expertise in handling the removal process. DIY may be possible for experienced individuals, but caution is advised.

Is It Necessary to Clean the Pipe Before Removing It?

Is cleaning necessary before removing a wood stove pipe? Yes, it is crucial to ensure proper removal. Cleaning helps prevent any debris or buildup from falling into the room, and ensures a smooth and safe removal process.

What Are Some Common Mistakes to Avoid When Removing a Wood Stove Pipe?

When removing a wood stove pipe, there are common mistakes to avoid. It’s important to take precautions to prevent damage, such as ensuring the stove is cool, supporting the pipe properly, and using the correct tools.

Are There Any Special Tools or Equipment Required for Removing a Wood Stove Pipe?

Yes, there are special tools needed to safely remove a wood stove pipe. It’s important to have a pipe wrench, screwdriver, and gloves. Safety precautions should include turning off the stove and wearing protective eyewear.

Can I Reuse the Removed Wood Stove Pipe for a Different Installation?

Sure, I can reuse the wood stove pipe for a different installation. It’s a great way to save money and make use of what you already have. Just make sure it’s in good condition and meets the requirements of the new installation.

Conclusion

Removing a wood stove pipe may seem like a daunting task, but with the right preparation and technique, it can be done smoothly.

Advertisement

By disconnecting the pipe from the stove, removing the sections carefully, and cleaning and inspecting the pipe, you can ensure a successful removal.

Remember to follow safety precautions throughout the process.

Although it may take some time and effort, removing the wood stove pipe is achievable for anyone with a little know-how and determination.

Terra grew up with a soul deeply connected to nature. Her earliest memories are of sun-drenched meadows, whispering woods, and the rhythmic dance of waves on a moonlit night. Every gust of wind, rustling leaf, and distant horizon beckoned her with tales waiting to be told.

Continue Reading
Advertisement

Wood Stove

What Does A Refractory Board On Wood Stove Do

Published

on

By

An image capturing the inner workings of a wood stove, with a close-up view of a refractory board

Were you aware that incorporating a refractory board into your wood stove can markedly enhance its efficiency? Indeed, it is true!

With its heat-resistant properties, a refractory board acts as a barrier, protecting your wood stove from extreme temperatures and preventing damage.

Not only does it enhance the heat efficiency of your stove, but it also ensures a longer lifespan.

In this article, I’ll delve into the benefits of a refractory board and provide helpful tips for choosing and maintaining the right one for your wood stove.

Key Takeaways

  • Provides insulation and retains heat generated by the wood stove
  • Acts as a thermal barrier, preventing heat escape and reducing energy wastage
  • Regulates and maintains consistent temperature inside the stove
  • Protects interior components, extending the lifespan of the wood stove

The Purpose of a Refractory Board

I learned that the main purpose of a refractory board is to provide at least two layers of insulation for the wood stove. The benefits of using a refractory board are numerous.

Firstly, it helps to retain the heat generated by the wood stove, ensuring that it’s efficiently utilized to warm the surrounding area. Additionally, the insulation provided by the refractory board helps to prevent the escape of heat, reducing energy wastage and ultimately saving on heating costs.

Advertisement

There are various types of refractory materials that can be used for wood stoves, including ceramic fiber boards, calcium silicate boards, and vermiculite boards. Each type has its own unique properties, such as high-temperature resistance and excellent heat retention, making them suitable for different applications.

Ultimately, the use of a refractory board in a wood stove greatly enhances its performance and efficiency.

How a Refractory Board Protects Your Wood Stove

During colder months, a refractory board acts as a barrier and protects your wood stove from excessive heat, ensuring its longevity. The insulating properties of the board help to prevent heat damage to the stove and surrounding areas. This is achieved by absorbing and distributing the intense heat generated by the burning wood, thereby reducing the risk of overheating and potential fire hazards. The refractory board also acts as a thermal barrier, preventing heat from escaping through the walls of the stove and increasing its overall efficiency. Additionally, the board helps to regulate the temperature inside the stove, allowing for more controlled and efficient burning of wood. Overall, the presence of a refractory board is crucial for maintaining the safety and performance of your wood stove.

Benefits of a Refractory Board How it Works
Insulating properties Absorbs and distributes heat
Preventing heat damage Acts as a thermal barrier
Increasing stove efficiency Regulates temperature
Ensuring safety Reduces risk of fire hazards

Enhancing Heat Efficiency With a Refractory Board

Using a refractory board in your wood stove can significantly enhance heat efficiency and reduce energy waste. Here’s how it works:

  • Insulation: A refractory board acts as insulation, preventing heat from escaping through the walls of the stove and maximizing heat output inside the stove.

  • Heat Reflection: The board reflects heat back into the firebox, increasing energy savings by ensuring that more heat is utilized for heating the room instead of being lost.

  • Heat Distribution: It helps distribute heat evenly throughout the stove, ensuring that all areas of the stove are heated efficiently.

  • Temperature Regulation: The board helps in regulating and maintaining a consistent temperature inside the stove, optimizing energy usage and reducing fuel consumption.

  • Protection: It protects the interior components of the wood stove from extreme temperatures, extending the lifespan of the stove and reducing maintenance costs.

Choosing the Right Refractory Board for Your Wood Stove

When selecting a refractory board for my wood stove, it’s essential to consider factors such as durability, heat resistance, and ease of installation.

Advertisement

A refractory board plays a crucial role in enhancing the insulation benefits of a wood stove. It acts as a barrier, preventing heat from escaping and ensuring maximum heat efficiency. The insulation properties of the board help maintain a consistent and controlled temperature inside the stove, resulting in more efficient burning and reduced energy consumption.

In addition to insulation benefits, durability is a key factor to consider when choosing a refractory board. It should be able to withstand high temperatures without cracking or deteriorating over time.

Ease of installation is also important for a hassle-free setup. Taking these factors into account will ensure that you select a high-quality refractory board that meets your needs.

Now, let’s explore some maintenance tips for a long-lasting refractory board.

Maintenance Tips for a Long-lasting Refractory Board

I’ve found that by regularly inspecting and cleaning around the refractory board, as well as applying a protective sealant, I can ensure its long-lasting performance. The refractory board plays a crucial role in a wood stove, providing insulation and protecting the surrounding components from excess heat.

Advertisement

To maximize its longevity benefits, here are some cleaning techniques I recommend:

  • Use a soft brush or vacuum to remove any dust or debris that may accumulate on the board.
  • Wipe the board with a damp cloth to remove any stubborn dirt or stains.
  • Avoid using abrasive cleaners or harsh chemicals that can damage the board’s surface.
  • Apply a high-temperature sealant to protect the board from moisture and prevent cracks.
  • Regularly check for any signs of wear or damage and address them promptly to prevent further issues.

Frequently Asked Questions

How Much Does a Refractory Board Cost?

Refractory boards have various applications, and their cost can vary depending on factors such as size and quality. They offer advantages such as heat resistance and durability, making them a valuable addition to wood stoves.

Can I Install a Refractory Board in My Existing Wood Stove?

Yes, you can install a refractory board in your existing wood stove. Refractory boards have many advantages, such as increasing heat efficiency and protecting the stove from damage. There are different types of refractory boards available to suit your specific needs.

How Long Does a Refractory Board Typically Last?

Typically, a refractory board on a wood stove lasts around 5-10 years. Signs of deterioration include cracks, crumbling, or a decrease in heat retention. When these signs appear, it’s time to replace the board.

Are There Any Specific Safety Precautions to Take When Using a Wood Stove With a Refractory Board?

When using a wood stove with a refractory board, it is important to take safety precautions. Regular maintenance is also necessary to ensure the board remains in good condition and maximizes its heat-resistant properties.

Can a Refractory Board Be Used in Other Heating Appliances, Such as Fireplaces or Outdoor Ovens?

A refractory board can also be used in heating appliances like fireplaces or outdoor ovens. It offers similar benefits as firebrick, but with added advantages such as heat retention and durability.

Advertisement

Conclusion

In conclusion, a refractory board is like the armor of a wood stove, protecting it from the intense heat and ensuring its longevity.

By creating a barrier between the fire and the stove, it prevents damage and enhances the stove’s efficiency by reflecting and radiating heat.

Choosing the right refractory board and regularly maintaining it will ensure a long-lasting and efficient wood stove experience.

So, think of a refractory board as the trusty shield that keeps your wood stove strong and roaring.

Advertisement
Continue Reading

Wood Stove

Who Can Fix Wood Stove Glas Door In Pa

Published

on

By

An image showcasing a skilled, experienced technician in Pennsylvania expertly repairing a wood stove glass door

Living in Pennsylvania, I completely understand the annoyance of handling a damaged glass door on a wood stove. However, don’t worry, I’ve discovered a solution to fix this problem.

There are certified technicians in PA who specialize in fixing wood stove glass doors. If you’re feeling handy, there are also DIY options available. Additionally, some wood stove manufacturers offer repair services.

In this article, I will share tips on finding reliable wood stove glass door repair services in PA. Let’s get that door fixed and the warmth flowing again!

Key Takeaways

  • Certified technicians in PA specialize in fixing wood stove glass doors.
  • Local wood stove repair companies can handle common issues like cracks, chips, and fogging.
  • DIY solution using vinegar and newspaper is effective for cleaning wood stove glass doors.
  • Some wood stove manufacturers offer repair services for their products.

Local Wood Stove Repair Services

I need to find a local wood stove repair service near me to fix my wood stove before the winter season starts. It’s important to address any issues with the wood stove, especially with the glass doors. Common issues with wood stove glass doors include cracks, chips, or even fogging due to the intense heat.

Local wood stove repair companies are equipped to handle these problems and ensure that the doors function properly. They’ve the expertise to repair or replace the glass doors efficiently. By contacting a local wood stove repair service, I can trust that my wood stove will be in good hands and ready for the colder months ahead.

Now, let’s discuss the importance of certified wood stove glass door technicians.

Advertisement

Certified Wood Stove Glass Door Technicians

Since I live in an area with cold winters, it’s crucial to have certified wood stove glass door technicians who can ensure the safety and efficiency of my wood stove.

When it comes to wood stove door replacement, it’s important to hire professionals who are knowledgeable and experienced in this specific field. They understand the intricacies of wood stove doors and can ensure a proper fit and seal.

In addition, these technicians can provide valuable advice on wood stove glass cleaning techniques to maintain the clarity and effectiveness of the glass door. Regular cleaning is essential to remove soot and creosote buildup, which can affect the performance of the wood stove.

DIY Solutions for Wood Stove Glass Door Repair

The most effective way to repair a wood stove glass door is by using a DIY solution like vinegar and newspaper.

Wood stove glass door cleaning is a crucial maintenance task to ensure the optimal performance of your stove. Over time, the glass can become dirty and stained, hindering the view of the fire and diminishing the overall aesthetic appeal.

Advertisement

Common causes of wood stove glass door damage include the accumulation of soot, creosote, and ash, as well as high temperatures causing the glass to crack or shatter.

To clean the glass, mix equal parts vinegar and water, then apply the solution to the glass using newspaper. Gently scrub in circular motions to remove any stubborn stains.

Once done, wipe the glass clean with a damp cloth and admire the clear view of your cozy fire.

Wood Stove Manufacturers With Repair Services

I found a reliable wood stove manufacturer near me that offers repair services for their products. This is great news for anyone who owns a wood stove and wants to ensure it stays in top condition. As someone who’s dealt with common wood stove problems in the past, I know how frustrating it can be when your stove isn’t functioning properly. That’s why I wanted to share some wood stove maintenance tips to help you avoid these issues.

Here are two sub-lists with more in-depth information:

Advertisement
  • Cleaning and Maintenance:

  • Regularly clean the stove, removing any ash or debris.

  • Check and clean the chimney to prevent blockages and improve efficiency.

  • Troubleshooting Common Problems:

  • If the stove isn’t producing enough heat, check the air vents and make sure they’re open.

  • If you notice a smell of smoke in the room, check for leaks in the stove’s seals.

Tips for Finding Reliable Wood Stove Glass Door Repair Services in PA

I’ve heard that there are several reliable wood stove glass door repair services in PA that you can count on.

When it comes to local wood stove repair companies, it’s important to find one that’s experienced and trustworthy.

Common issues with wood stove glass doors include cracks, chips, and fogging. These problems can’t only affect the aesthetics of your wood stove, but they can also impact its functionality.

That’s why it’s crucial to find a repair service that can address these issues promptly and effectively.

Look for companies that specialize in wood stove glass door repair and have a proven track record of customer satisfaction.

Advertisement

Additionally, make sure they use high-quality materials and offer reasonable pricing.

With the right repair service, you can restore your wood stove glass door to its former glory and enjoy a cozy and efficient heating experience.

Frequently Asked Questions

How Much Does It Cost to Repair a Wood Stove Glass Door in Pennsylvania?

Repairing a wood stove glass door in Pennsylvania can cost anywhere from $100 to $500, depending on the extent of the damage and the professional you hire. DIY alternatives may be cheaper but require caution and skill.

Can I Repair a Cracked Wood Stove Glass Door Myself?

I can repair a cracked wood stove glass door myself. It requires careful handling and the right tools. First, remove the door. Then, clean the glass and apply a high-temperature adhesive. Finally, let it dry and reattach the door.

Are There Any Wood Stove Manufacturers in Pennsylvania That Offer Repair Services?

I’ve got great news for wood stove owners in Pennsylvania! There are wood stove manufacturers in the state that offer top-notch repair services, including wood stove glass replacement. You’re in good hands!

Advertisement

How Long Does It Typically Take to Repair a Wood Stove Glass Door?

On average, it takes about a few hours to repair a wood stove glass door. Common causes of damage include high heat, impact, or improper maintenance. It’s important to consult a professional for proper repair.

Are There Any Special Certifications or Qualifications Required to Become a Wood Stove Glass Door Technician in Pennsylvania?

As an expert wood stove glass door technician in Pennsylvania, I can assure you that there are indeed special certifications and qualifications required for this role. The intricate nature of the job demands precision and expertise.

Conclusion

Finding reliable wood stove glass door repair services in PA can be a daunting task, but fear not! Local repair services, certified technicians, and even DIY solutions are available to help fix your wood stove.

Additionally, some wood stove manufacturers offer repair services for their products. By considering these options and following these tips, you’ll be able to find the right professionals to restore your wood stove to its former glory.

So don’t wait, get your wood stove glass door fixed and enjoy the warmth and coziness it brings to your home.

Advertisement
Continue Reading

Wood Stove

How Much Does It Cost To Get Permits For A Wood Stove In Jefferson County Mo

Published

on

By

An image capturing the process of obtaining wood stove permits in Jefferson County, MO

Considering installing a wood stove in Jefferson County, MO? Prior to enjoying the warm embrace of your fire, you must initially address the less enjoyable chore of securing the necessary permits.

But don’t worry, I’ve got you covered! In this article, I’ll break down the cost of getting permits for a wood stove in Jefferson County. From application process to fees and even tips for saving money, we’ll cover it all.

Let’s get started!

Key Takeaways

  • The permit application process for a wood stove in Jefferson County, MO involves a timeline, avoiding common mistakes, submitting documents on time, and inspection of the installation.
  • The cost breakdown for permit fees includes varying costs depending on the type of permit, such as a $50 installation permit fee, $40 inspection fee, and $25 processing fee for each application. However, veterans and low-income residents may qualify for permit fee waivers.
  • Additional expenses to consider include installation requirements and associated fees, maintenance and inspection fees, the impact of these expenses on the overall cost, and budgeting for chimney cleaning and maintenance.
  • Tips for saving money on permit costs include timing the application during off-peak seasons, preparing all necessary documentation, ensuring proper sizing of the wood stove, researching and planning ahead, and minimizing costs to stay within budget.

Overview of Permit Requirements

I understand the overview of permit requirements and will ensure that all necessary documents are submitted.

When it comes to obtaining permits for a wood stove in Jefferson County, it’s important to be aware of the permit application timeline and avoid common permit mistakes.

The permit application timeline typically involves submitting the application and supporting documents, followed by an inspection of the installation. It’s crucial to submit the application in a timely manner to avoid any delays in the approval process.

Advertisement

Additionally, it’s essential to double-check all the required documents to avoid common permit mistakes such as missing information or incorrect forms.

Permit Application Process

The permit application process requires careful attention to detail and thorough documentation, but it can be completed efficiently with proper guidance. To ensure a smooth and timely process, it’s important to understand the permit processing time and the required documentation.

Here are the key points to keep in mind:

  • Permit processing time: It’s essential to be aware of the average processing time for permits in your area. This will help you plan your project accordingly and avoid any delays.

  • Required documentation: The application will typically require specific documents such as building plans, permits from other departments, contractor information, and proof of insurance. It’s crucial to gather all the necessary paperwork to avoid any setbacks in the review process.

  • Guidance and assistance: Seeking guidance from professionals or experienced individuals who’ve gone through the process can be immensely helpful. They can provide valuable insights and ensure that your application is complete and meets all the requirements.

Cost Breakdown for Permit Fees

A breakdown of the cost for permit fees can be found in the county’s official documentation.

As I researched the permit application process for getting permits for a wood stove in Jefferson County, I discovered that the cost varies depending on the type of permit needed.

Advertisement

For example, the installation permit fee is $50, while the inspection fee is $40. Additionally, there’s a processing fee of $25 for each permit application.

The county also offers permit fee waivers for certain individuals, such as veterans and low-income residents.

It’s important to note that the permit application timeline can range from a few days to a few weeks, so it’s advisable to plan ahead and submit the application well in advance of the desired installation date.

Additional Expenses to Consider

When budgeting for a wood stove installation, it’s crucial to factor in the cost of additional expenses, such as chimney cleaning and maintenance. These additional expenses are important to consider because they can significantly impact the overall cost of installing and maintaining a wood stove.

Some of the key additional expenses to keep in mind include:

Advertisement
  • Installation requirements: Depending on your location, there may be specific installation requirements that need to be met, such as permits or inspections. These requirements often come with associated fees.

  • Maintenance and inspection fees: Once your wood stove is installed, regular maintenance and inspections are necessary to ensure its safety and efficiency. These services typically come with fees that need to be factored into your budget.

Considering these additional expenses alongside the cost of the wood stove itself will give you a more accurate picture of the total investment required.

Now, let’s move on to some tips for saving money on permit costs.

Tips for Saving Money on Permit Costs

As someone who frequently installs wood stoves, I’ve found that it’s essential to research and plan ahead in order to save money on permit costs. In Jefferson County, MO, obtaining permits for wood stove installations can be a significant expense. However, by implementing a few simple tips and strategies, you can minimize these costs and stay within your budget.

Strategy Description
1. Timing Schedule your permit application during off-peak seasons when demand is lower and fees may be reduced.
2. Adequate Documentation Prepare all necessary documents, including the manufacturer’s specifications, installation manual, and any additional certifications required by the local authorities.
3. Proper Sizing Ensure that your wood stove is appropriately sized for your space to avoid costly modifications or rejections during the inspection process.

Frequently Asked Questions

Are There Any Restrictions on the Size or Type of Wood Stove That Can Be Installed With a Permit in Jefferson County, Mo?

There are restrictions on the size and type of wood stove that can be installed with a permit in Jefferson County, MO. The cost of the permit for wood stove installation depends on various factors.

How Long Does It Typically Take to Receive a Permit for a Wood Stove Installation in Jefferson County, Mo?

Typical wait times for a wood stove permit in Jefferson County, MO, can vary, but it usually takes around 2-4 weeks. Common delays may occur due to incomplete applications or high demand.

Advertisement

Are There Any Specific Guidelines for the Installation of a Wood Stove, Such as Clearance Requirements or Ventilation Standards?

There are specific guidelines for wood stove installation in Jefferson County, MO. These include clearance requirements and ventilation standards. It’s important to follow these guidelines for safe and proper installation.

Do I Need to Hire a Professional Contractor to Install a Wood Stove, or Can I Do It Myself With a Permit in Jefferson County, Mo?

I can install a wood stove myself with a permit in Jefferson County, MO. However, it’s recommended to hire a professional contractor for safety reasons. The cost of professional installation varies depending on the complexity of the job.

Are There Any Ongoing Maintenance or Inspection Requirements for Wood Stoves in Jefferson County, MO, After Obtaining a Permit?

After obtaining a permit for a wood stove in Jefferson County, MO, there are ongoing maintenance requirements and inspection requirements. It is important to regularly maintain and have the stove inspected to ensure safety and compliance.

Conclusion

In conclusion, obtaining permits for a wood stove in Jefferson County, MO can be a costly process. However, with proper planning and research, homeowners can save money on permit costs.

Remember, ‘a penny saved is a penny earned.’ So, make sure to thoroughly understand the permit requirements, navigate the application process efficiently, and consider all additional expenses before installing a wood stove.

Advertisement
Continue Reading

Trending