Connect with us

Wood Stove

How To Use Pellets In A Wood Stove

Published

on

An image featuring a well-stocked wood stove with pellets neatly arranged in a glass container nearby

I am excited to share my knowledge on effectively using pellet fuel, a great improvement in heating efficiency for wood stove users.

In this article, I’ll guide you through the ins and outs of using pellets in your wood stove. From selecting the right pellets to loading and igniting them, I’ll provide all the technical know-how you need to maximize your stove’s performance.

Let’s dive in and unlock the secrets of pellet-powered warmth!

Key Takeaways

  • Pellets are a clean and efficient alternative to traditional firewood.
  • Consider factors like moisture content, ash content, and pellet type when choosing the right pellets for your wood stove.
  • Proper preparation of your wood stove, including cleaning and inspection, is necessary before using pellets.
  • Regular cleaning, adjusting air intake, and using high-quality pellets are key to efficiently burning pellets in your wood stove.
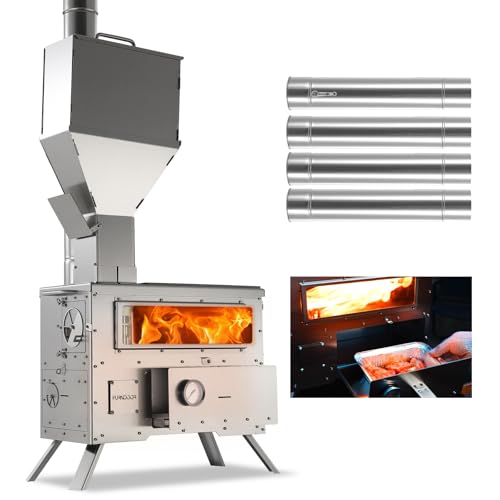
Understanding Pellets: What Are They and How Do They Work

I’m learning about pellets and how they work in my wood stove. Pellets are small, cylindrical fuel sources made from compressed organic materials such as sawdust, wood chips, and agricultural waste. They’re an excellent alternative to traditional firewood due to their consistent size and composition.

The composition of pellets ensures that they burn efficiently, producing a high heat output and minimal ash residue. This makes them not only convenient to use but also environmentally friendly.

The benefits of using pellets in a wood stove are numerous. They’re highly efficient, as the controlled combustion of pellets results in less wasted heat. Additionally, pellets have a lower moisture content compared to firewood, which means they burn cleaner and produce less smoke and creosote buildup.

Advertisement

Transitioning into the next section, it’s essential to choose the right pellets for your wood stove to ensure optimal performance and longevity.

Choosing the Right Pellets for Your Wood Stove

Finding the right pellets for my wood stove can be a challenge, but it’s important to consider factors like moisture content, ash content, and pellet type to ensure efficient and clean burning.

When comparing pellet types, hardwood pellets are known for their dense composition and higher heat output, while softwood pellets are lighter and produce less ash. Both types have their advantages, so it’s important to consider your specific needs and preferences.

Factors to consider when purchasing pellets include cost and quality. While higher quality pellets may come at a higher cost, they often burn more efficiently and produce less ash. It’s important to strike a balance between cost and quality to ensure optimal performance.

Now that we’ve discussed choosing the right pellets, let’s move on to preparing your wood stove for pellet use.

Advertisement

Preparing Your Wood Stove for Pellet Use

To ensure proper functionality, it’s essential to clean the ash from the wood stove before transitioning to pellet use. Here are four important steps to prepare your wood stove for pellet use:

  1. Remove all ash: Begin by completely emptying the ash pan and ash drawer. Use a metal scoop or shovel to carefully remove any remaining ash or debris from the firebox. Make sure to wear gloves to protect your hands from any sharp edges.

  2. Clean the flue: Use a chimney brush to clean the flue thoroughly. Remove any creosote buildup or obstructions that may hinder proper airflow. This step is crucial for preventing chimney fires and ensuring efficient burning of pellets.

  3. Inspect the gaskets: Check the door gaskets for any signs of wear or damage. Replace them if necessary to maintain a tight seal. Proper sealing is crucial for preventing air leaks and optimizing pellet combustion.

  4. Clean the exhaust vents: Remove any soot or residue from the exhaust vents using a brush or vacuum. This will prevent blockages and ensure proper ventilation.

Loading and Igniting Pellets in Your Wood Stove

I carefully load the pellets into the wood stove, and then ignite them using a fire starter.

Pellet maintenance is crucial to ensure optimal performance and efficiency of your wood stove.

Before loading the pellets, it’s important to inspect them for any signs of damage or moisture. Damaged pellets can lead to inconsistent combustion and poor heat output.

Once the pellets are loaded, it’s important to ensure proper airflow to facilitate ignition. Troubleshooting pellet ignition issues can involve checking the air intake, exhaust, and igniter for any obstructions or malfunctions.

Advertisement

Additionally, regular cleaning of the stove and ash removal is necessary to prevent pellet buildup and maintain efficient combustion.

Following these guidelines will help you achieve a successful pellet ignition and maximize the benefits of your wood stove.

Tips for Efficiently Burning Pellets in Your Wood Stove

Using the correct amount of pellets for efficient burning in my wood stove has significantly improved its performance. Here are four tips for maximizing heat output and troubleshooting common pellet burning issues:

  1. Properly clean the stove: Regularly cleaning the stove’s burn pot and ash pan ensures optimal airflow and combustion. This prevents pellet build-up and allows for efficient burning.

  2. Adjust the air intake: By adjusting the air intake, you can control the burn rate and heat output. It’s crucial to find the right balance to achieve maximum efficiency without excessive smoke or soot.

  3. Use high-quality pellets: Choosing high-quality pellets with low moisture content and minimal ash content is essential. Inferior pellets can lead to poor combustion and reduced heat output.

  4. Maintain proper ventilation: Ensure that your wood stove is properly vented to allow for efficient combustion. Blockages or inadequate airflow can hinder the burning process and limit heat production.

Frequently Asked Questions

Can I Mix Different Brands of Pellets in My Wood Stove?

Yes, you can mix different brands of pellets in your wood stove. However, it is important to consider storage requirements for wood pellets and the potential environmental impact of using them in a wood stove.

How Often Do I Need to Clean My Wood Stove When Using Pellets?

When using pellets in a wood stove, it is important to clean it regularly to maintain optimal performance. The cleaning frequency depends on the pellet quality and usage, but generally, it should be done at least once a month.

Advertisement

Are There Any Special Safety Precautions to Consider When Using Pellets in a Wood Stove?

Proper ventilation is crucial when using pellets in a wood stove to prevent the buildup of harmful carbon monoxide. Understanding the potential risks of carbon monoxide poisoning is essential for safe operation.

Can I Use Pellets in a Wood Stove That Is Already Installed in My Home?

Yes, you can use pellets in a wood stove that is already installed in your home. Using pellets in a wood stove offers numerous benefits over traditional firewood, such as higher efficiency and cleaner combustion.

How Long Do Pellets Typically Last in a Wood Stove Before Needing to Be Refilled?

Typically, pellets last around 6 to 8 hours in a wood stove before needing to be refilled. Properly storing pellets is crucial to maintain their quality and prevent moisture absorption. Using pellets in a wood stove offers benefits such as efficiency and cleaner combustion.

Conclusion

In conclusion, utilizing pellets in your wood stove can greatly enhance its efficiency and performance. By understanding the nature of pellets and selecting the right ones for your stove, you can ensure a clean and effective burn.

Preparing your stove and properly loading and igniting the pellets are crucial steps in achieving optimal results. By following these steps and implementing efficient burning techniques, you can enjoy a cozy and satisfying warmth while reducing your environmental impact.

Advertisement

Logan’s affair with adventure began in childhood. He hailed from a small town where vast forests bordered one side and endless shores stretched on the other. His days were spent exploring uncharted woods, climbing tall trees, or listening to the tales of old sailors. This early immersion in a world brimming with stories and mysteries became the foundation of his passion for writing.

Continue Reading
Advertisement

Wood Stove

How Long Does It Take Wood To Ignite Aftee Being Put In A Wood Stove

Published

on

By

An image capturing the mesmerizing scene of a wood stove, with a bed of glowing embers beneath carefully stacked logs, as tendrils of thin smoke gracefully curl upwards, depicting the anticipation of wood slowly igniting

I must admit, the wait for wood to catch fire in a wood stove can seem never-ending. However, do not worry, as in this article, I will share some strategies and tips to speed up the process.

From understanding the temperature and moisture content of the wood to choosing the right type and preparing it efficiently, we’ll explore all the factors that affect wood ignition time.

So let’s dive in and get that fire blazing in no time!

Key Takeaways

  • Weather conditions and moisture content of the wood can affect the ignition time.
  • Properly seasoned wood with around 20% moisture content ignites more easily.
  • Smaller wood logs and softer woods tend to ignite faster than larger and harder woods.
  • Proper wood storage and preparation, such as keeping it off the ground, using fire starters, and maintaining airflow, can help ensure faster ignition in a wood stove.

Factors Affecting Wood Ignition Time

I’m curious about the factors that can affect the time it takes for wood to ignite in a wood stove.

One of the key factors is the weather conditions. Cold and damp weather can make it harder for the wood to catch fire, as moisture content in the wood can be high. It’s important to ensure that the wood is properly seasoned and has a moisture content of around 20% for optimal ignition.

Another factor to consider is the size of the wood logs. Smaller logs tend to ignite more quickly as they’ve a larger surface area exposed to the heat source.

Advertisement

Additionally, the type of wood being used can also affect ignition time, with softer woods igniting faster than harder woods.

Temperature and Moisture Content of Wood

The optimal moisture content for wood is around 20%, which ensures efficient ignition in a wood stove. The wood ignition process is influenced by various factors, and the moisture content plays a critical role in determining how quickly the wood will ignite.

When wood is too wet, it requires more energy to burn off the excess moisture before it can reach its ignition point. On the other hand, if the wood is too dry, it may ignite too quickly and burn too rapidly, leading to inefficient combustion and wasted energy.

Therefore, it’s essential to properly store wood to maintain its moisture content within the optimal range. Proper wood storage involves keeping the wood off the ground, covering it to protect it from rain or snow, and allowing for proper airflow to prevent excessive moisture buildup.

Type of Wood and Its Density

I prefer using hardwoods like oak or maple due to their density and their ability to burn longer and provide more heat. When it comes to wood species selection, it’s important to consider the impact of wood moisture content. Here are three key points to keep in mind:

Advertisement
  1. Moisture content affects combustion efficiency: Wet wood contains a higher moisture content, which leads to incomplete combustion and the production of more smoke and pollutants. Dry hardwoods, on the other hand, burn more efficiently and produce less smoke.

  2. Heat output is influenced by wood density: Hardwoods have a higher density compared to softwoods, resulting in a higher heat output. This means that hardwoods like oak and maple can provide more warmth and keep your space cozy for a longer period of time.

  3. Longer burn time with hardwoods: Due to their density, hardwoods burn at a slower rate, allowing for a longer burn time per log. This means less frequent refueling and a more consistent heat source.

Preparing Wood for Efficient Ignition

To ensure efficient ignition, I always make sure to properly split and dry my firewood. Proper wood storage is essential for achieving this. It’s important to store the firewood in a well-ventilated area, off the ground and protected from moisture. This allows the wood to dry properly and reduces the risk of it being damp or rotting.

When it comes to igniting the wood in a wood stove, using fire starters or kindling can greatly speed up the process. These small pieces of flammable material help create a hot and sustained flame, which in turn ignites the larger pieces of wood.

By incorporating these techniques, you can ensure a faster and more efficient ignition in your wood stove.

Now, let’s move on to some tips for faster wood ignition in a wood stove.

Tips for Faster Wood Ignition in a Wood Stove

Using kindling and ensuring proper airflow are key to achieving faster wood ignition in a wood stove. When it comes to stubborn wood that’s difficult to ignite, there are several ignition techniques that can be employed:

Advertisement
  1. Preparation: Properly seasoned wood with a moisture content below 20% is essential for efficient ignition. This ensures that the wood is dry enough to catch fire quickly.

  2. Kindling: Creating a bed of small, dry kindling underneath the larger logs helps to ignite the fire faster. Kindling acts as a fuel source that ignites easily and produces enough heat to catch the larger logs on fire.

  3. Airflow: Adequate airflow is crucial for wood ignition. By opening the damper or adjusting the air vents, you can ensure that enough oxygen is getting to the fire, promoting faster ignition.

While some may consider using accelerants to speed up wood ignition, it’s important to note that this can be dangerous and may result in uncontrollable fires or the release of harmful chemicals. It’s recommended to rely on proper ignition techniques and patience for a safe and efficient wood ignition process.

Frequently Asked Questions

Can I Use Treated Wood in My Wood Stove?

Using pressure treated wood in a wood stove is not recommended due to the chemicals it releases when burned. It is safer to use untreated wood or other alternatives for faster ignition.

What Is the Best Type of Wood to Use for Faster Ignition in a Wood Stove?

Fast burning woods like pine or fir can ignite in a wood stove within minutes. To ensure efficient wood stove usage, it’s important to choose dry, seasoned firewood and properly maintain the stove.

Are There Any Safety Precautions I Should Take When Igniting Wood in a Wood Stove?

When igniting wood in a wood stove, it is important to take safety precautions. Keep a fire extinguisher nearby and ensure proper ventilation. Additionally, the moisture content of the wood can affect its ignition time.

Can I Use Wood Chips or Sawdust for Ignition in a Wood Stove?

I can use wood chips or sawdust for ignition in a wood stove. They are effective fire starters for faster ignition. The small size and high surface area make them ignite quickly, reducing the time needed for the wood to catch fire.

Advertisement

How Does the Size of the Wood Affect Its Ignition Time in a Wood Stove?

Moisture content significantly affects wood ignition in a wood stove. Smaller pieces of wood ignite faster due to increased surface area. However, larger pieces provide longer burn times. Consider the advantages and disadvantages of each for efficient use in a wood stove.

Conclusion

After careful analysis of the factors affecting wood ignition time, it’s safe to say that wood doesn’t ignite instantly in a wood stove. Contrary to popular belief, wood requires time to reach its ignition point, which is influenced by factors such as temperature, moisture content, and wood density.

To expedite the process, it’s crucial to choose the right type of wood and ensure it’s properly prepared. So, if you were expecting an immediate burst of flames, you might’ve to wait a little longer.

Continue Reading

Wood Stove

Why Does Your Wood Stove Smoke

Published

on

By

An image capturing a rustic, cozy living room

Dealing with the smoke from your wood stove can be a real nuisance. But don’t worry, I’m here to provide some tips on how to manage it.

Understanding the root causes of this predicament is crucial. Insufficient airflow, improper wood selection, damaged chimney, inadequate maintenance, and incorrect installation are the major culprits.

Let’s delve into each of these factors to uncover the secrets behind why your wood stove may be producing that bothersome smoke.

Key Takeaways

  • Blocked vents disrupt combustion process and lead to incomplete burning and smoke generation.
  • Burning wet or high-moisture wood results in inefficient burning and increased creosote buildup.
  • Cracked or deteriorating chimney can cause leaks and smoke entry.
  • Inadequate stove maintenance, including dirty burners and clogged flue, can lead to smoke issues.

Insufficient Airflow

I’m having trouble with my wood stove smoking because there’s not enough airflow. A common cause of insufficient airflow is blocked vents. When the vents are blocked, the combustion process is disrupted, leading to incomplete burning of the wood and the generation of smoke.

To ensure efficient combustion and minimize smoke, it’s crucial to maintain clear and unobstructed vents. Blocked vents can result from a buildup of creosote or debris, so regular cleaning is essential.

Additionally, proper placement of the stove is crucial to ensure adequate airflow. Make sure that the stove is positioned away from any obstructions, such as furniture or curtains, that might impede the flow of air.

Advertisement

Improper Wood Selection

To prevent excessive smoke and poor combustion, it’s important to avoid burning wet wood or wood with high moisture content, as it can result in inefficient burning and increased creosote buildup. When burning seasoned firewood, which has a moisture content of around 20% or less, the wood burns more efficiently, producing less smoke and providing more heat output. Seasoned firewood has been properly dried for at least six months, allowing the moisture content to decrease significantly. This ensures that the wood burns cleanly and effectively in your wood stove. However, if you burn wood with high moisture content, it will create more smoke and reduce the overall efficiency of your stove. This can also lead to a higher risk of creosote buildup in your chimney, which can be dangerous and increase the chance of a chimney fire. Therefore, it’s crucial to always use dry, seasoned firewood to prevent excessive smoke and maintain proper combustion in your wood stove.

Now, let’s discuss another potential reason for excessive smoke: a damaged or leaky chimney.

Damaged or Leaky Chimney

A damaged or leaky chimney can cause smoke to enter your home, which can be hazardous to your health and safety. It’s important to address any issues with your chimney promptly to ensure the proper functioning of your wood stove.

Here are three signs of a damaged chimney that you should be aware of:

  1. Cracked or crumbling mortar: If you notice any cracks or crumbling in the mortar joints of your chimney, it could indicate water damage or structural issues. This can lead to leaks and smoke entering your home.

  2. Rusty or deteriorating chimney cap: The chimney cap plays a crucial role in keeping out rain, snow, debris, and animals. If it’s rusty or deteriorating, it may not be able to perform its function effectively, allowing smoke to escape into your living space.

  3. Smoke stains or odors: If you notice smoke stains on the walls or ceilings near your chimney or detect a persistent smoky odor in your home, it could be a sign of a leaky chimney. This should be addressed promptly to prevent further damage and potential health risks.

When faced with a damaged chimney, there are various repair options available, such as chimney relining, chimney crown repair, and chimney flashing repair. It’s important to consult with a professional chimney technician to determine the best course of action for your specific situation.

Advertisement

Inadequate Stove Maintenance

One of the main causes of smoke in your home can be the result of inadequate stove maintenance. A dirty stove and a clogged flue are two common culprits that can lead to smoke issues. When the stove isn’t properly cleaned, a buildup of soot and debris can occur on the burners, causing incomplete combustion and the production of smoke.

Additionally, a clogged flue prevents the proper ventilation of smoke, leading to its accumulation inside your home. Regular cleaning and maintenance of your stove, including cleaning the burners and ensuring the flue is clear, is crucial in preventing smoke issues.

It’s recommended to schedule annual professional maintenance to ensure your stove is in optimal condition and to avoid the inconvenience and potential health hazards associated with smoke in your home.

Incorrect Stove Installation

I regret not hiring a professional for my stove installation, as it has caused numerous issues and potential hazards. When it comes to installing a wood stove, proper positioning and sizing are crucial factors that shouldn’t be taken lightly.

Here are three key reasons why improper stove positioning and incorrect flue size can lead to problems:

Advertisement
  1. Inadequate clearance: Placing the stove too close to combustible materials can increase the risk of fire. It’s essential to follow the manufacturer’s guidelines for proper clearances to ensure the safe operation of the stove.

  2. Inefficient heating: Incorrect positioning can hinder the stove’s ability to distribute heat effectively throughout the room. This can result in uneven temperatures and wasted energy, leading to discomfort and higher heating costs.

  3. Insufficient draft: Using an incorrect flue size can impede the stove’s ability to expel smoke and gases properly. This can lead to backdrafting, where smoke enters the room instead of being directed outside. Aside from the health hazards, backdrafting can damage the stove and cause indoor air quality issues.

To avoid these problems, it’s essential to consult a professional for the proper installation of your wood stove. They’ll ensure that the stove is positioned correctly and the flue size is appropriate for efficient and safe operation.

Frequently Asked Questions

Can Smoking Occur if There Is Sufficient Airflow in the Wood Stove?

Yes, smoking can still occur in a wood stove even with sufficient airflow. Factors like improper wood placement, damp or unseasoned wood, or a clogged chimney can all contribute to smoking issues. Proper troubleshooting can resolve these problems and improve wood stove performance.

What Are Some Common Wood Types That Should Be Avoided to Prevent Smoking in a Wood Stove?

To prevent smoking in a wood stove, it is important to avoid using wood types like pine, as they contain high levels of resin. Additionally, properly seasoning firewood is crucial to reduce smoke production.

How Can I Identify if My Chimney Is Damaged or Leaking?

To identify chimney damage or leaks, conduct a thorough chimney inspection. Look for cracks, loose bricks, or crumbling mortar. Additionally, consider installing a smoke detector near the stove to quickly detect any smoke issues.

Besides Regular Cleaning, What Other Maintenance Practices Can Help Prevent Smoking in a Wood Stove?

Other maintenance practices, such as ensuring proper airflow and avoiding certain wood types, can help prevent smoking in a wood stove. Identifying chimney damage or leaks and checking for correct stove installation are also crucial.

Advertisement

What Are Some Signs of Incorrect Stove Installation That May Lead to Smoking?

Installing a wood stove improperly can lead to frustrating smoke issues. One key sign is if the chimney height is too short. Another is using unseasoned wood, which can cause excessive smoke.

What Are Some Wood Stove Brands That Have Smoke-Reducing Features?

Looking for the best wood stove brands with smoke-reducing features? Look no further. With increasing concerns about air pollution, several brands are innovating their wood stoves to minimize smoke emissions. Some notable options include Vermont Castings, Jøtul, and Blaze King. These brands prioritize efficiency and clean burning, ensuring you can enjoy the warmth of a wood stove while minimizing environmental impact.

Conclusion

In conclusion, when your wood stove smokes, it’s often due to factors such as:

  • Insufficient airflow
  • Improper wood selection
  • A damaged or leaky chimney
  • Inadequate stove maintenance
  • Incorrect installation

To prevent this, you should:

  • Ensure proper ventilation
  • Use seasoned and dry wood
  • Inspect and repair your chimney regularly
  • Maintain your stove diligently
  • Ensure professional installation

By addressing these issues, you can enjoy a smoke-free and efficient wood stove experience, creating a cozy and inviting atmosphere in your home.

Continue Reading

Wood Stove

How To Build A Wood Stove From A Jerry Can

Published

on

By

An image showcasing the step-by-step process of transforming a jerry can into a wood stove

I have always been fascinated by the concept of transforming ordinary objects into useful tools.

So when I came across an old jerry can in my garage, I knew I had the perfect opportunity to create my own wood stove.

In this article, I’ll guide you through the process of transforming a jerry can into a functional and efficient wood stove, complete with ventilation, legs, and a base.

Get ready to unleash your inner DIY enthusiast and start enjoying the warmth of your homemade wood stove.

Key Takeaways

  • Consider the capacity and dimensions of the jerry can
  • Compare different materials for jerry cans
  • Prepare and clean the jerry can properly
  • Take safety precautions and use the right tools when modifying the jerry can

Selecting the Right Jerry Can for Your Wood Stove

I’m trying to figure out which jerry can is the best option for my wood stove.

When it comes to choosing the right size jerry can for your wood stove, it’s important to consider the capacity and dimensions. A larger can will hold more fuel, but it may be too bulky for your space. On the other hand, a smaller can may require more frequent refills.

Advertisement

Additionally, it’s crucial to compare different materials for jerry cans to ensure optimal wood stove performance. Metal cans are durable and resistant to heat, but they can also be heavy. Plastic cans, on the other hand, are lightweight and easier to handle, but may not withstand high temperatures as well.

Ultimately, finding the perfect jerry can for your wood stove is about balancing capacity, dimensions, and material for efficient and safe operation.

Preparing and Cleaning the Jerry Can

Before starting to use the jerry can, it’s crucial to properly clean and prepare it by removing any dirt or residue, and then ensuring it’s completely dry. Here is the cleaning process and safety precautions to follow:

  1. Rinse the jerry can with warm water and a mild detergent to remove any dirt or debris. Use a sponge or brush to scrub the inside and outside of the can thoroughly.

  2. Rinse the can again with clean water to remove any soap residue. Make sure to rinse it multiple times to ensure all the soap is gone.

  3. After rinsing, allow the jerry can to air dry completely. This is important to prevent any moisture from causing rust or corrosion.

By following these cleaning steps, you can ensure that your jerry can is ready for modification.

Now, let’s discuss cutting open and modifying the jerry can for ventilation.

Advertisement

Cutting Open and Modifying the Jerry Can for Ventilation

I’ll explain how to use a few small holes in the jerry can to provide adequate ventilation for the wood stove. When modifying the jerry can for ventilation, it is important to take safety precautions and use the right tools. Here is a table outlining the necessary steps:

Step Safety Precautions Tools Needed
1 Wear protective gloves and goggles Drill
2 Work in a well-ventilated area Marker
3 Ensure the jerry can is empty and clean Metal file
4 Mark the desired ventilation holes on the can Safety glasses
5 Use the drill to create the holes Protective gloves
6 Smooth the edges of the holes with the metal file Goggles
7 Clean any metal shavings from the can Clean cloth

Adding Legs and a Base to the Wood Stove

I can attach some sturdy legs and a stable base to the wood stove to ensure it stands securely on any surface. Achieving stove stability is crucial to prevent accidents and maintain proper functioning.

When choosing materials for the legs and base, it’s important to consider their strength, durability, and heat resistance. Here are three essential elements to consider:

  1. Material Selection: Opt for materials that can withstand high temperatures, such as stainless steel or cast iron. These materials are known for their strength and ability to withstand the intense heat generated by the wood stove.

  2. Design and Construction: The design of the legs should provide sufficient support and stability. Consider a tripod or four-leg design for optimal balance. Additionally, ensure the legs are securely attached to the stove body to prevent any wobbling or instability.

  3. Base Size and Shape: The base of the wood stove should be wide and flat enough to distribute the weight evenly, ensuring stability on various surfaces. A larger base will provide better stability, especially when using the stove on uneven or soft ground.

Testing and Using Your DIY Wood Stove

I’ve successfully tested and now use my DIY wood stove to cook meals while camping. It’s a simple yet effective solution for outdoor cooking. However, before using it, I took several testing techniques and safety precautions to ensure its efficiency and my own well-being.

Firstly, I conducted a leak test to ensure there were no air or gas leaks that could potentially cause a fire hazard. This involved pressurizing the stove and checking for any signs of leakage. I also tested its heat distribution by placing a pot of water on the stove and monitoring how evenly the heat was dispersed.

Advertisement

To further ensure safety, I implemented safety precautions such as maintaining a safe distance between the stove and any flammable objects, using heat-resistant gloves when handling the stove, and having a fire extinguisher nearby.

Using my DIY wood stove has been a game-changer for my camping trips. Not only does it provide a reliable cooking source, but it also allows me to enjoy the natural surroundings without relying on traditional campfire cooking methods. By following proper testing techniques and safety precautions, I can confidently cook my meals and enjoy the great outdoors.

Frequently Asked Questions

How Long Does It Take to Build a Wood Stove From a Jerry Can?

It takes about 2 hours to build a wood stove from a jerry can. The benefits of using a wood stove include cost-effective heating and a sustainable fuel source. Regular cleaning and maintenance ensure optimal performance.

Can I Use Any Type of Wood for the Base of the Wood Stove?

I can use different types of wood for the base of the wood stove, but it’s important to consider safety precautions when using it indoors. Proper ventilation and non-flammable materials are crucial.

Is It Safe to Use the Wood Stove Indoors?

Oh, using a wood stove indoors, what a brilliant idea! Let me enlighten you on the potential health hazards and share some precise tips for safely using one. Shall we begin?

Advertisement

Can I Paint the Jerry Can After Modifying It?

Yes, you can paint the modified jerry can using various painting techniques. It is important to choose a paint that can withstand high temperatures and adhere well to metal surfaces. Make sure to consider alternative fuel sources when painting for safety.

What Tools Do I Need to Build a Wood Stove From a Jerry Can?

To build a wood stove from a jerry can, I need a few tools like a jigsaw, drill, and metal file. Safety precautions are crucial, and alternative materials can be used if necessary.

Can I Use a Wood Stove Insert in a DIY Jerry Can Wood Stove?

When considering building a wood stove fireplace, it’s crucial to factor in the cost of materials and construction. However, if you’re planning to use a wood stove insert in a DIY Jerry Can Wood Stove, the cost of building a wood stove fireplace may decrease significantly. This alternative method combines affordability and practicality, making it an excellent choice for those seeking an alternative heating solution.

Can Duraflame Logs Be Used in a Wood Stove Made from a Jerry Can?

Can Duraflame logs be used in a wood stove made from a jerry can? Many DIY enthusiasts wonder about using Duraflame logs in a wood stove. While Duraflame logs are commonly used in traditional fireplaces, their use in a jerry can wood stove may not be ideal. It’s important to consider the safety and compatibility aspects of using duraflame logs in wood stoves specifically designed for them.

Conclusion

After carefully selecting the right jerry can, preparing and modifying it for ventilation, and adding sturdy legs and a stable base, your DIY wood stove is ready for testing and use.

Advertisement

With its compact design and efficient functionality, this wood stove provides a practical and cost-effective heating solution for outdoor activities or emergency situations.

Embrace the warmth and convenience of this homemade creation, bringing comfort and coziness wherever you go.

Continue Reading

Trending