Wood Stove
How Far Should A Wood Stove Be Away From A Wall
As a homeowner, I have always followed the advice of “better safe than sorry,” particularly when it comes to the installation of a wood stove. Therefore, what is the recommended distance between a wood stove and a wall?
In this article, we’ll explore the minimum clearance requirements, fire safety regulations, and factors to consider when determining the distance between your wood stove and a combustible wall.
Stay tuned to ensure a safe and cozy home heating experience.
Key Takeaways
- Wood stoves should have a minimum clearance of 36 inches from combustible walls.
- Consult the manufacturer’s instructions and local building codes for specific clearance requirements.
- Non-combustible materials such as heat shields can be used to reduce the required clearance distance.
- Regularly inspect and maintain the wood stove to ensure proper functioning and prevent the risk of accidental fires.
Minimum Clearance Requirements for Wood Stove Placement
What are the minimum clearance requirements for placing a wood stove?
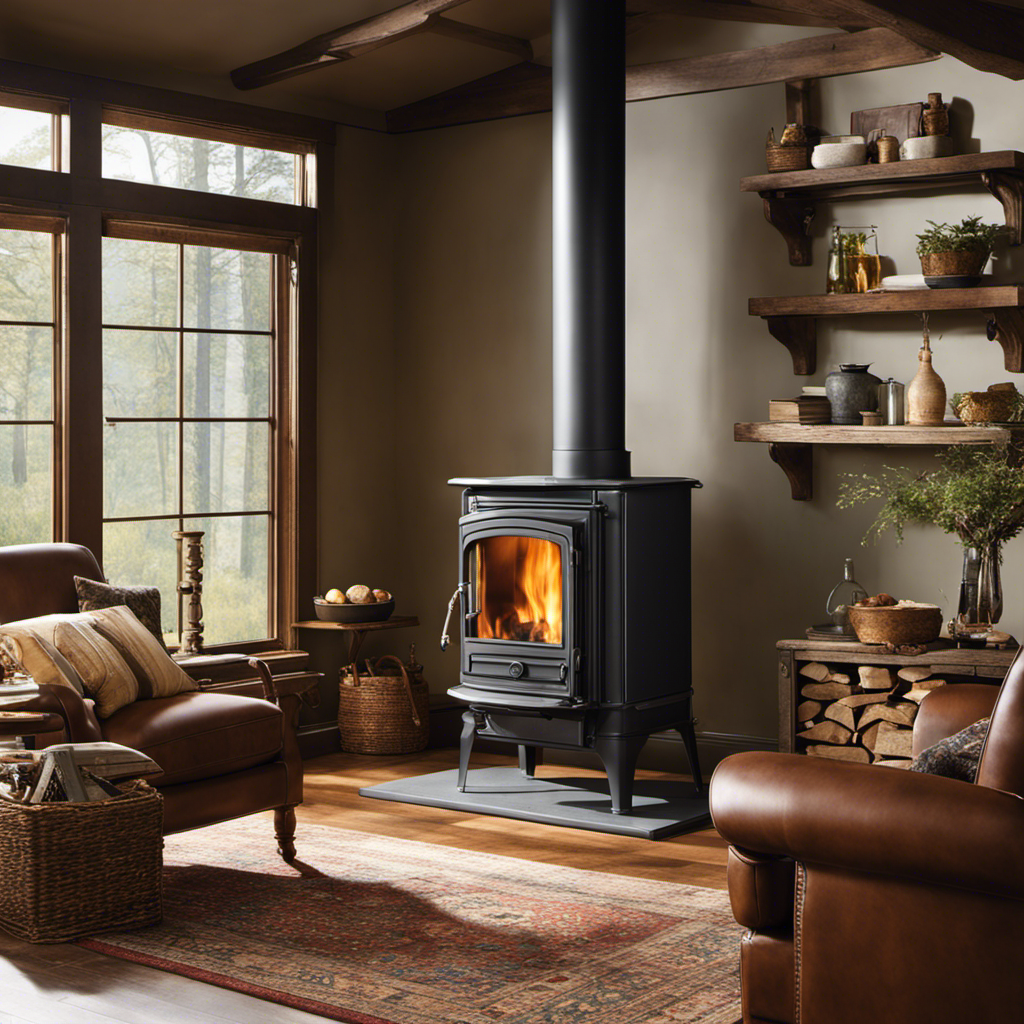
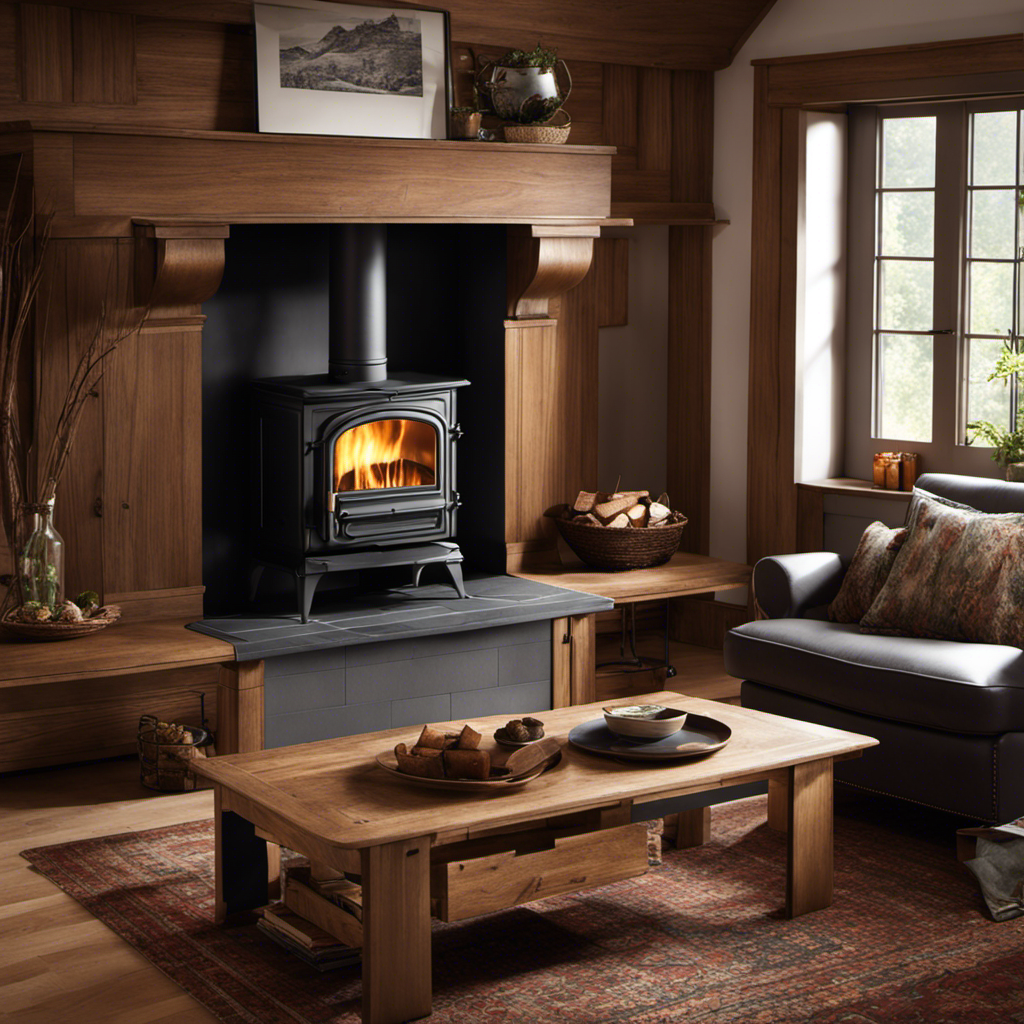
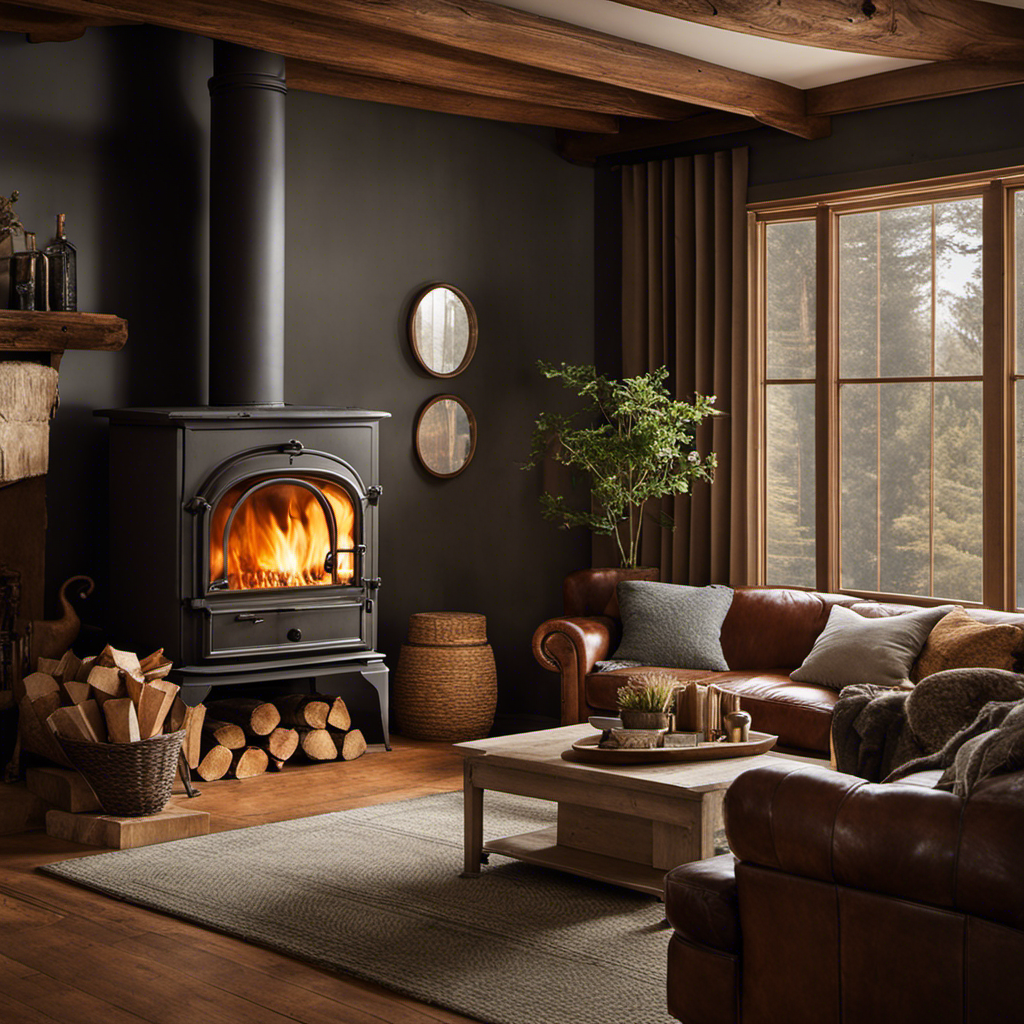
When it comes to fire safety and complying with building code requirements, it’s crucial to ensure that a wood stove is installed with proper clearance. The minimum clearance requirements vary depending on the specific stove and the type of wall it’s placed against.
Generally, wood stoves should have a minimum clearance of 36 inches from combustible walls. This distance helps prevent the risk of fire and allows for proper airflow around the stove. However, it’s important to consult the manufacturer’s instructions and local building codes for specific clearance requirements.
Additionally, non-combustible materials such as heat shields can be used to reduce the required clearance distance.
Following these minimum clearance requirements ensures a safe and compliant wood stove installation.
Fire Safety Regulations for Wood Stove Clearance
I am currently discussing the importance of adhering to fire safety regulations for wood stove clearance. Proper wood stove installation is crucial to ensure the safety of both the occupants and the surrounding environment. Here are three key fire safety precautions to consider:
-
Maintain proper clearance: It’s essential to follow the manufacturer’s guidelines for the minimum distance between the wood stove and combustible materials such as walls, furniture, and flooring. This clearance helps prevent the risk of accidental fires.
-
Use non-combustible materials: When installing a wood stove, it’s crucial to use non-combustible materials for the surrounding area. This includes heat-resistant materials for the wall, floor, and any other surfaces near the stove.
-
Regular maintenance and inspections: Regularly inspecting and maintaining the wood stove is vital to ensure its proper functioning. This includes checking for any cracks, leaks, or damage and cleaning the stove and chimney regularly to prevent the buildup of flammable substances.
Factors to Consider When Determining Wood Stove Distance From Wall
One important factor to consider when determining the distance between a wood stove and the wall is the manufacturer’s recommended minimum clearance of at least 12 inches. This safety precaution is crucial to prevent any potential fire hazards and ensure the proper functioning of the wood stove. However, there are other factors to consider as well. These include the type of wall material, heat shielding options, and local building codes. For example, if the wall is made of combustible material such as wood, additional clearance may be required. It is also important to install heat shielding options, such as a non-combustible hearth pad or a heat shield on the wall, to further enhance safety. Additionally, local building codes may have specific requirements regarding wood stove clearances that must be adhered to. By considering these factors and following the necessary safety precautions, one can ensure a safe and efficient wood stove installation.
Factors to Consider | Safety Precautions |
---|---|
Manufacturer’s recommended minimum clearance | Install heat shielding options |
Type of wall material | Follow local building codes |
Recommended Distance Between Wood Stove and Combustible Wall Materials
I always make sure to follow the recommended distance between my wood stove and combustible wall materials to ensure a safe and fire-free environment. Maintaining safe clearances is crucial when installing a wood stove, as it reduces the risk of heat transfer to nearby walls and minimizes the chance of ignition.
Here are three key points to consider regarding the recommended distance:
-
Manufacturer’s Specifications: It’s essential to refer to the manufacturer’s guidelines for the specific wood stove model. They provide specific recommendations for the safe clearance distance required between the stove and combustible wall materials.
-
National Fire Protection Association (NFPA) Standards: The NFPA provides standards and guidelines for the installation of wood stoves. These guidelines include recommendations for safe clearances to ensure proper ventilation and prevent potential fire hazards.
-
Local Building Codes: Always check with your local building codes and regulations. They may have specific requirements for safe clearances that need to be followed to ensure compliance and safety.
Maintaining Safe Clearances for Wood Stove Installation
Maintaining safe clearances for wood stove installation is essential, but it requires careful consideration and adherence to recommended guidelines.
To ensure a safe installation, it’s crucial to understand the clearance measurements required for wood stoves. These clearance measurements refer to the minimum distance that should be maintained between the stove and any combustible materials, such as walls, furniture, or curtains.
Safe installation practices dictate that the recommended clearances should be followed to prevent the risk of fire and ensure efficient operation of the wood stove. The specific clearance requirements may vary depending on the type of stove and the manufacturer’s instructions, so it’s important to consult the product manual or seek professional advice.
Frequently Asked Questions
What Are the Potential Risks or Dangers of Placing a Wood Stove Too Close to a Wall?
Potential consequences of placing a wood stove too close to a wall include increased risk of fire, overheating of the wall, and damage to the surrounding area. Safety precautions such as proper clearance must be followed to prevent these dangers.
Can I Install a Wood Stove in a Small Room With Limited Space Between the Stove and the Walls?
In a small room with limited space, it is crucial to consider the proper installation of a wood stove. Ensuring adequate distance between the stove and walls is essential for safety and preventing potential hazards.
Are There Any Specific Building Codes or Regulations Regarding Wood Stove Placement That I Should Be Aware Of?
Regarding wood stove placement, it is crucial to consider building code requirements and safety precautions. These regulations dictate the minimum distance that a wood stove should be away from a wall to ensure proper ventilation and prevent potential fire hazards.
Can I Use Non-Combustible Materials to Reduce the Required Distance Between the Wood Stove and the Wall?
Yes, using non-combustible materials can reduce the required distance between the wood stove and the wall. This can have a significant impact on room temperature, allowing for more efficient heat distribution.
How Often Should I Check and Maintain the Clearance Between the Wood Stove and the Wall to Ensure Ongoing Safety?
To ensure ongoing safety, I check and maintain the clearance between my wood stove and the wall regularly. This helps prevent any potential fire hazards and ensures that the stove operates efficiently and safely.
Conclusion
In conclusion, it’s crucial to maintain proper clearance between a wood stove and the wall to ensure fire safety. According to fire safety regulations, the minimum distance required is typically around 36 inches.
However, it’s recommended to consult the manufacturer’s guidelines and local building codes for specific requirements. By following these guidelines, we can reduce the risk of fire accidents and ensure the safe installation of wood stoves in our homes.
Logan’s affair with adventure began in childhood. He hailed from a small town where vast forests bordered one side and endless shores stretched on the other. His days were spent exploring uncharted woods, climbing tall trees, or listening to the tales of old sailors. This early immersion in a world brimming with stories and mysteries became the foundation of his passion for writing.
Wood Stove
How Do I Find The Cubic Foot Of A Wood Stove Fire Box
I’ve constantly wondered about the **cubic footage** of the firebox in a wood stove. Knowing the firebox size is key in selecting the perfect wood stove for effective heating. If you want a cozy home, pay attention to this detail.
In this article, I’ll share a step-by-step guide on how to measure the dimensions of the firebox and calculate its cubic foot. By following these instructions, you’ll be able to make an informed decision when selecting a wood stove for your heating needs.
Key Takeaways
- The size of the firebox impacts the efficiency and effectiveness of a wood stove.
- Accurate measurement of the firebox is essential in selecting the right wood stove.
- Measuring the length, width, and height of the firebox helps determine its cubic foot capacity.
- Choosing the right size wood stove for your firebox is important for heating efficiency.
Understanding the Importance of Measuring the Firebox
I’m realizing the significance of measuring the firebox for understanding its capacity. When exploring different firebox designs, it becomes evident that size matters.
A properly sized firebox offers numerous benefits that contribute to the overall efficiency and effectiveness of a wood stove. By accurately measuring the firebox, you can determine its cubic foot capacity, which directly impacts the amount of wood it can hold and burn at a given time.
A larger firebox allows for longer burn times and the ability to accommodate larger wood logs, reducing the need for frequent refueling. On the other hand, a smaller firebox may require more frequent refueling but can be beneficial for those with limited space or heating needs.
Understanding the importance of measuring the firebox is essential in selecting the right wood stove for your specific requirements.
Gathering the Necessary Tools for Measurement
To accurately measure the firebox, I’ll need to gather a tape measure and a notepad for recording the dimensions. Measuring accuracy is crucial in obtaining precise calculations for the cubic foot of a wood stove firebox. Common measurement mistakes can lead to inaccurate results and potential problems later on.
By following a step-by-step guide, we can ensure that our measurements are precise and reliable. Let’s start by measuring the length, width, and height of the firebox. I’ll then record these dimensions in a table for easy reference.
Once we’ve gathered all the necessary measurements, we can move on to calculating the cubic foot of the firebox. By paying attention to detail and avoiding common measurement mistakes, we can achieve accurate and reliable results.
Now, let’s move on to the step-by-step guide to measuring the firebox dimensions.
Step-by-Step Guide to Measuring the Firebox Dimensions
I’ll carefully measure the length, width, and height of the firebox to ensure accurate dimensions. Measuring accuracy is crucial when determining the cubic foot of a wood stove firebox. One common mistake people make isn’t measuring the firebox correctly, resulting in inaccurate calculations.
To begin, I’ll use a tape measure to measure the length of the firebox from one end to the other. Next, I’ll measure the width, ensuring to include any protrusions or irregularities. Finally, I’ll measure the height, starting from the bottom of the firebox to the top.
It’s important to be precise and avoid rounding off measurements. By following these steps and avoiding common mistakes, I can accurately determine the cubic foot of the wood stove firebox.
Calculating the Cubic Foot of the Firebox
Since the cubic foot of the firebox is calculated by multiplying the length, width, and height, it’s important to accurately measure all three dimensions. Calculating the cubic foot of a wood stove firebox requires precision and attention to detail. Here’s how you can ensure accuracy when estimating the volume:
Measure each dimension: Use a tape measure to determine the length, width, and height of the firebox. Take multiple measurements to account for any irregularities.
Convert measurements to feet: The cubic foot is the standard unit for volume, so make sure all measurements are in feet. Convert inches to feet by dividing by 12.
Multiply the dimensions: Once you have the measurements in feet, multiply the length, width, and height together to find the total volume in cubic feet.
Verify your calculations: Double-check your math to ensure accuracy. Any errors in the calculations will result in an inaccurate cubic foot measurement.
Tips for Choosing the Right Size Wood Stove for Your Firebox
Honestly, I think the most important tip for choosing the right size wood stove for your firebox is to carefully consider the dimensions and make sure it fits properly.
When it comes to heating efficiency, the size of the stove plays a crucial role. A stove that’s too small will struggle to heat your space efficiently, while a stove that’s too large will waste energy and overheat the room.
To determine the right size, you need to calculate the cubic foot of your firebox. Measure the length, width, and height, and multiply these dimensions together. This will give you the cubic foot measurement.
Additionally, consider your firewood storage capacity. A larger firebox will allow you to burn bigger logs, reducing the number of times you need to restock.
What is the size and capacity of the Cubic Grizzly Wood Stove fire box compared to other wood stoves?
The install cubic grizzly wood stove has a firebox size of 3.7 cubic feet and can accommodate logs up to 18 inches in length. This is larger than many other wood stoves, allowing for longer burn times and more heat production. The capacity and efficiency of this stove make it a popular choice for heating large spaces.
Frequently Asked Questions
What Are the Benefits of Measuring the Cubic Foot of a Wood Stove Firebox?
Measuring the cubic foot of a wood stove firebox offers several benefits. It allows you to properly size a wood stove for your firebox, ensuring optimal heat output and efficiency. Plus, it helps determine the amount of wood needed for burning.
Can I Use Any Measuring Tools I Have at Home, or Do I Need Specific Tools for Measuring the Firebox Dimensions?
I can use any measuring tools I have at home to measure the firebox dimensions, but it’s recommended to use specific measuring tools for accuracy.
Are There Any Safety Precautions I Should Take While Measuring the Firebox Dimensions?
When measuring the firebox dimensions, it’s important to prioritize safety precautions. Ensure the area is clear of flammable materials, wear protective gear, and use proper measuring tools to accurately determine the cubic foot of the wood stove firebox.
Can I Calculate the Cubic Foot of the Firebox if Its Shape Is Irregular?
To accurately calculate the volume of an irregularly shaped firebox, I recommend using the water displacement method. Fill the firebox with water, measure the amount used, and convert it to cubic feet.
How Do I Know if I Have Chosen the Right Size Wood Stove for My Firebox?
When choosing the right size wood stove for your firebox, there are several factors to consider. These include the size of the room, insulation, and heating needs. It’s important to carefully assess these factors to ensure optimal heat distribution and efficiency.
Conclusion
In conclusion, accurately measuring the cubic foot of a wood stove firebox is crucial in order to choose the right size wood stove for optimal heating efficiency.
By following the step-by-step guide provided and using the necessary tools, you can easily calculate the cubic foot of your firebox.
This will ensure that you select a wood stove that’s the perfect fit for your heating needs, adding sophistication and precision to your decision-making process.
Growing up surrounded by the vast beauty of nature, Sierra was always drawn to the call of the wild. While others sought the comfort of the familiar, she ventured out, embracing the unpredictable and finding stories in the heartbeat of nature.
At the epicenter of every remarkable venture lies a dynamic team—a fusion of diverse talents, visions, and passions. The essence of Best Small Wood Stoves is crafted and refined by such a trio: Sierra, Logan, and Terra. Their collective expertise has transformed the platform into a leading authority on small wood stoves, radiating warmth and knowledge in equal measure.
Wood Stove
How To Replace A Gasket On A Wood Stove
I’m facing an issue: the seal on my wood stove has lost its effectiveness. This problem is causing heat to escape, resulting in higher energy bills.
But fear not, because I’ve got the solution. In this article, I’ll show you how to replace that worn-out gasket on your wood stove. With just a few tools and some elbow grease, you’ll have your stove sealed up tight in no time.
So let’s get started and get that heat where it belongs – inside your home.
Key Takeaways
- Assess the condition of the gasket by checking its texture, flexibility, and looking for cracks or fraying.
- Gather the necessary tools and materials such as high-temperature resistant gasket material, specialized adhesive, utility knife, wire brush, and clean cloth.
- Remove the old gasket by gently scraping off loose sections, using a wire brush to remove residue, and cleaning the area with mild detergent and warm water.
- Install the new gasket by carefully positioning it onto the clean area, selecting the appropriate size, applying adhesive, and allowing it to cure before closing the stove or using it.
Assessing the Condition of the Gasket
I can feel the gasket to check for any signs of wear or damage. The lifespan of a gasket can vary depending on usage and maintenance, so it’s crucial to determine its condition before replacing it.
When assessing the gasket, I examine its texture and flexibility. A healthy gasket should feel smooth and supple, with no visible cracks or fraying. If the gasket is brittle, stiff, or shows signs of deterioration, such as crumbling or peeling, it’s a clear indication of wear and tear.
Additionally, I inspect the gasket for any gaps or irregularities in its seal when the door is closed. These signs help me determine whether it’s time to replace the gasket and ensure optimal functionality of the wood stove.
Gathering the Necessary Tools and Materials
To get started, I’ll need a few tools and materials for this gasket replacement project. Here is a list of items you’ll need:
Gasket material: Choosing the right gasket material is crucial for a successful replacement. Look for high-temperature resistant materials like fiberglass or ceramic fiber.
Gasket adhesive: You’ll need a specialized adhesive designed for high-temperature applications. Make sure it’s compatible with the gasket material you’ve chosen.
Utility knife: A sharp utility knife will help you remove the old gasket and trim the new one to the right size.
Wire brush: Before installing the new gasket, you need to prepare the stove surface by removing any debris or old adhesive. A wire brush will do the job effectively.
Clean cloth: It’s important to have a clean cloth to wipe off any dust or residue from the stove surface before applying the adhesive.
With these tools and materials, you’ll be ready to tackle the gasket replacement project with precision and efficiency.
Removing the Old Gasket
After carefully inspecting the condition of the old gasket, it was clear that it needed to be removed before continuing with the replacement process. To remove the old gasket, I first used a putty knife to gently scrape off any loose or deteriorated sections.
Then, I used a wire brush to remove any remaining gasket residue from the gasket area. It was important to be thorough in this step to ensure proper adhesion of the new gasket.
Once all the residue was removed, I cleaned the gasket area with a mild detergent and warm water to remove any dirt or grease. This step is crucial for a clean and secure gasket installation.
With the old gasket removed and the gasket area cleaned, I was now ready to move on to installing the new gasket.
Installing the New Gasket
With all the necessary preparations complete, I carefully positioned the new gasket onto the clean gasket area. Ensuring proper gasket placement is crucial for a successful installation.
Here are some common gasket installation mistakes to avoid:
Using the wrong size gasket: Measure your stove door or flue carefully and select the appropriate gasket size.
Forgetting to clean the surface: Before installing the new gasket, remove any remnants of the old gasket and clean the surface thoroughly.
Applying too much adhesive: Use a thin and even layer of high-temperature adhesive to secure the gasket in place. Excess adhesive can cause the gasket to bulge or fail.
Not allowing the adhesive to cure: Give the adhesive enough time to cure according to the manufacturer’s instructions before closing the stove or using it.
Neglecting regular maintenance: Even with a new gasket, regular maintenance is essential to ensure optimum performance and prevent future issues.
Testing and Maintaining the New Gasket
I regularly inspect and clean the new gasket to ensure it’s functioning properly. Testing methods for the gasket involve checking for any gaps or leaks that may compromise the seal.
One effective way to test the gasket is by performing a smoke test. To do this, I close all the stove’s openings and light a small piece of paper near the gasket area. If smoke escapes, it indicates a faulty seal.
Troubleshooting tips for the gasket include checking for any signs of wear, such as fraying or flattening. If any issues are found, I carefully remove the old gasket and replace it with a new one.
It’s crucial to follow the manufacturer’s instructions and use high-quality gasket material to ensure optimal performance and safety.
Can Measuring A Wood Stove Gasket Help in Replacing It?
When replacing a wood stove gasket, measuring the wood stove gasket is crucial to ensuring the new gasket will fit properly. Take accurate measurements to determine the required size for a snug and effective seal. This will help to prevent heat loss and ensure efficient stove operation.
Frequently Asked Questions
How Often Should I Replace the Gasket on My Wood Stove?
I replace the gasket on my wood stove every 1-2 years. Regular gasket maintenance is important to ensure proper sealing and prevent heat loss. Neglecting it can lead to reduced efficiency and potential damage.
Can I Use Any Type of Gasket Material for My Wood Stove?
Yes, you can use different types of gasket materials for your wood stove. However, it is important to consider the pros and cons of each material to ensure proper sealing and safety.
Is It Necessary to Clean the Area Where the Old Gasket Was Before Installing the New One?
Yes, it is necessary to clean the area where the old gasket was before installing the new one. This ensures proper adhesion and prevents any debris from interfering with the sealing process.
Can I Use Adhesive to Secure the New Gasket in Place?
Yes, I can use adhesive to secure the new gasket in place. However, it is important to follow best practices for securing gaskets and consider if adhesive is recommended for other stove repairs.
How Long Does It Take for the Adhesive to Dry Before I Can Use the Wood Stove Again?
It is crucial to allow proper drying time for the adhesive when replacing a gasket on a wood stove. Factors such as temperature and humidity can affect the drying time.
Conclusion
In conclusion, replacing a gasket on a wood stove is a necessary maintenance task that can be easily completed with the right tools and materials.
While some may argue that hiring a professional is the best option, this article has provided step-by-step instructions that make the process simple and achievable for anyone.
By following these precise and detailed directions, you can ensure the optimal functioning of your wood stove and extend its lifespan.
Growing up surrounded by the vast beauty of nature, Sierra was always drawn to the call of the wild. While others sought the comfort of the familiar, she ventured out, embracing the unpredictable and finding stories in the heartbeat of nature.
At the epicenter of every remarkable venture lies a dynamic team—a fusion of diverse talents, visions, and passions. The essence of Best Small Wood Stoves is crafted and refined by such a trio: Sierra, Logan, and Terra. Their collective expertise has transformed the platform into a leading authority on small wood stoves, radiating warmth and knowledge in equal measure.
Wood Stove
How To Make Your Wood Stove More Efficient
You might think that enhancing the efficiency of your wood stove is a complex and lengthy process. However, I can assure you that it is simpler than you realize.
In this article, I’ll guide you through simple steps to maximize the heat output of your wood stove. From choosing the right wood to improving airflow and insulating your stove, I’ll show you practical ways to enhance its efficiency.
With regular maintenance and cleaning, you’ll have your wood stove performing at its best in no time.
Key Takeaways
- Regular cleaning and inspection improve efficiency
- Burning dry and seasoned wood minimizes smoke production
- Choosing the right kind of wood maximizes heat output
- Improving airflow and combustion efficiency through regular maintenance and cleaning.
Understanding the Basics of Wood Stove Efficiency
I’m currently learning about the basics of wood stove efficiency.
One important aspect to consider is wood stove maintenance. Regular cleaning and inspection of your stove can greatly improve its efficiency. Removing any built-up soot and debris from the stove and chimney allows for better airflow and combustion, resulting in a more efficient burn.
Another way to improve efficiency is by reducing smoke emissions. Burning dry and seasoned wood helps to minimize smoke production, as wet or unseasoned wood tends to burn inefficiently and produce more smoke.
In addition, using the right kind of wood can maximize heat output. Hardwoods like oak or maple burn longer and hotter than softwoods like pine or spruce.
Choosing the Right Wood for Maximum Heat Output
Using hardwoods like oak or maple, and not softwoods like pine or spruce, is essential for achieving maximum heat output from your wood stove. Here are a few reasons why:
-
Seasoning wood properly:
Moisture content in wood affects its ability to burn efficiently. Hardwoods have a lower moisture content compared to softwoods, allowing them to burn hotter and produce more heat. -
Higher energy density:
Hardwoods have a higher energy density, meaning they contain more potential heat energy per volume. This results in a longer and more sustained burn, providing consistent heat output. -
Utilizing wood stove accessories for better heat distribution:
Accessories like heat fans or heat-powered stove fans can help circulate warm air throughout the room more effectively. This ensures that the heat produced by the wood stove is evenly distributed and maximized. -
Longer burn time:
Hardwoods burn slower than softwoods, resulting in a longer burn time. This means less frequent refueling and a more efficient use of wood.
Improving Airflow and Combustion Efficiency
How can I ensure proper airflow and maximize combustion efficiency in my wood stove?
One of the key factors in achieving efficient combustion is to ensure proper airflow. This can be achieved by regularly cleaning the air vents and chimney to remove any blockages that may hinder the flow of air.
Additionally, using eco-friendly fuel alternatives, such as compressed sawdust logs or wood pellets, can help improve combustion efficiency. These fuels are designed to burn more efficiently and produce less smoke and ash.
Another way to maximize efficiency is by increasing insulation around your wood stove. This can be done by installing a heat-resistant barrier or using a heat reflector to redirect the heat back into the room.
Insulating Your Wood Stove for Better Heat Retention
By insulating your wood stove and using a heat reflector, you can increase its heat retention and reduce energy waste. Here are some practical tips to make your wood stove more efficient:
-
Install a blower fan: A blower fan helps in better heat distribution by circulating the warm air throughout the room. This ensures that the heat is evenly spread, making your space more comfortable.
-
Use heat resistant glass: Upgrading to heat resistant glass for your wood stove door can significantly improve insulation. It prevents heat from escaping and allows you to enjoy the comforting sight of the fire without compromising on efficiency.
-
Seal any gaps or leaks: Inspect the areas around your wood stove for any gaps or leaks. Using high-temperature silicone or gaskets can help seal these openings, preventing heat loss.
-
Add insulation around the stove: Consider adding insulation around the walls, floor, and ceiling near the wood stove to further reduce heat loss. This will help keep the heat inside the room, making it more energy-efficient.
Regular Maintenance and Cleaning for Optimal Performance
I always ensure that I schedule regular maintenance and cleaning for my wood stove to maintain its optimal performance.
Cleaning techniques are essential to keep the stove functioning efficiently. One of the most common issues with wood stoves is a buildup of creosote, which can lead to chimney fires. To prevent this, I regularly clean the interior of the stove using a wire brush and remove any creosote buildup.
Additionally, I inspect the gaskets and seals to ensure they’re intact and replace them if necessary. Troubleshooting common issues such as a weak flame or difficulty in starting the fire can often be resolved by cleaning the air vents and removing any ash or debris.
Frequently Asked Questions
Can I Use My Wood Stove to Heat My Entire Home?
Yes, I can use my wood stove to heat my entire home. Wood stove installation offers many benefits for heating, including cost savings, cozy warmth, and the ability to rely less on other heating sources.
What Are the Potential Health Risks Associated With Using a Wood Stove?
Potential health risks associated with using a wood stove include poor indoor air quality, which can lead to respiratory issues and exacerbate existing conditions. Proper ventilation and regular maintenance can help mitigate these risks.
How Can I Prevent Creosote Buildup in My Chimney?
To prevent chimney fires and remove creosote buildup, regular cleaning and maintenance are essential. I recommend scheduling annual chimney inspections, using creosote removal techniques such as chimney brushes and creosote removal products.
Can I Use Alternative Fuels, Such as Pellets or Coal, in My Wood Stove?
Yes, you can use alternative fuels like pellets or coal in your wood stove. They offer benefits such as higher heat output and longer burn times. However, it’s important to follow the manufacturer’s guidelines for safe and efficient use.
What Safety Precautions Should I Take When Using a Wood Stove?
When using a wood stove, it’s important to prioritize safety. Proper ventilation is crucial to prevent carbon monoxide buildup. Regular wood stove maintenance, such as cleaning the chimney and inspecting for leaks, is essential for safe operation.
Conclusion
In conclusion, by implementing some simple strategies, you can greatly improve the efficiency of your wood stove.
Did you know that a well-insulated wood stove can reduce heat loss by up to 80%? This means more heat stays inside your home, resulting in lower energy costs and a warmer living space.
So, take the time to choose the right wood, improve airflow, insulate your stove, and perform regular maintenance to maximize its performance and save money in the long run.
Growing up surrounded by the vast beauty of nature, Sierra was always drawn to the call of the wild. While others sought the comfort of the familiar, she ventured out, embracing the unpredictable and finding stories in the heartbeat of nature.
At the epicenter of every remarkable venture lies a dynamic team—a fusion of diverse talents, visions, and passions. The essence of Best Small Wood Stoves is crafted and refined by such a trio: Sierra, Logan, and Terra. Their collective expertise has transformed the platform into a leading authority on small wood stoves, radiating warmth and knowledge in equal measure.
-
Wood Stove9 months ago
How To Build A Thermoelectric Generator For A Wood Stove
-
Wood Stove6 months ago
What Can I Use As Insulation On Wood Stove Pipes
-
Wood Stove2 months ago
How To Use Damper And Draft On Wood Stove
-
Wood Stove2 weeks ago
How Far Does Wood Stove Have To Be From Wall
-
Wood Stove9 months ago
How To Make A Heat Shield For A Wood Stove
-
Wood Stove1 month ago
When To Open And Close Damper On Wood Stove
-
Wood Stove9 months ago
How To Use The Flue On A Wood Stove
-
Wood Stove6 months ago
How To Install A Wood Stove Pipe And Chimney