
To build a brick outdoor pizza oven, choose a flat, well-ventilated site away from overhanging branches and support it on a sturdy concrete foundation. Construct a dome-shaped chamber using firebricks, making sure to layer and secure them properly for durability. Insulate with ceramic fiber or insulating mortar to maintain high heat. Gradually cure the oven over several days, then preheat to 700-900°F. If you explore further, you’ll discover detailed steps to ensure your oven’s long-lasting performance and ideal pizza making.
Key Takeaways
- Select a flat, well-ventilated site away from overhanging branches and build a stable foundation with a concrete slab.
- Use firebricks to construct a dome-shaped chamber, layering them securely for durability and heat retention.
- Insulate the oven with ceramic fiber or insulating mortar to improve heat retention and cooking efficiency.
- Cure the oven gradually over several days, then preheat to 700-900°F for optimal pizza baking.
- Prepare dough properly, leave a small vent for smoke, and maintain high temperatures for perfect outdoor pizza.
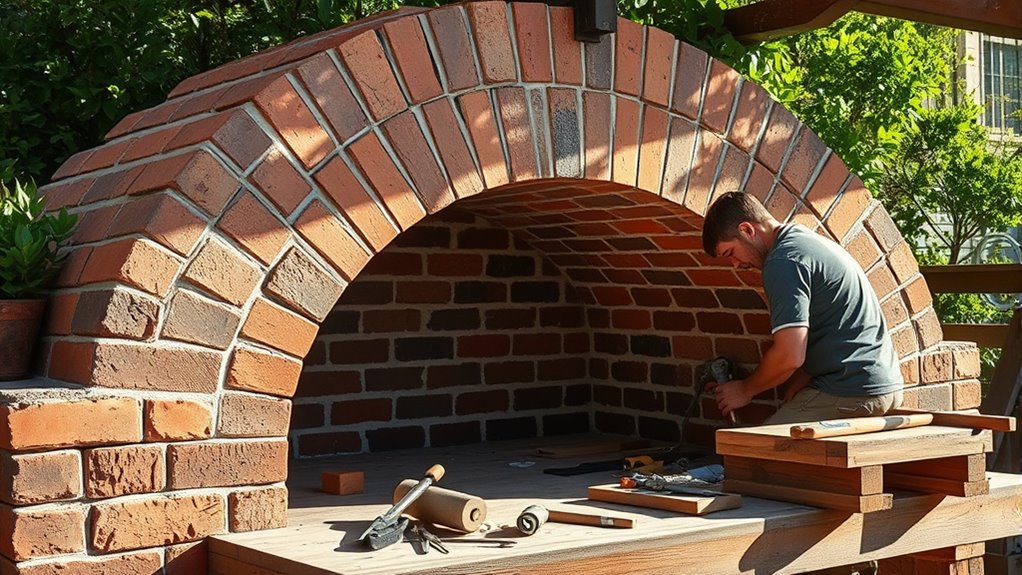
Building a brick outdoor pizza oven is a rewarding project that brings authentic flavor and entertainment to your backyard. This process starts with selecting the right location, ideally a flat, well-ventilated area away from overhanging branches. Once you’ve chosen the spot, you’ll need a solid foundation, usually a concrete slab, to support the weight of the oven. Proper foundation guarantees stability and longevity, so don’t cut corners here. When it comes to creating the oven structure, you’ll want to focus on building a dome-shaped chamber with firebricks, which can withstand high temperatures. These bricks are essential for consistent heat retention, allowing you to cook pizza with a perfect crust every time.
Building a brick pizza oven requires a solid foundation and dome-shaped firebrick chamber.
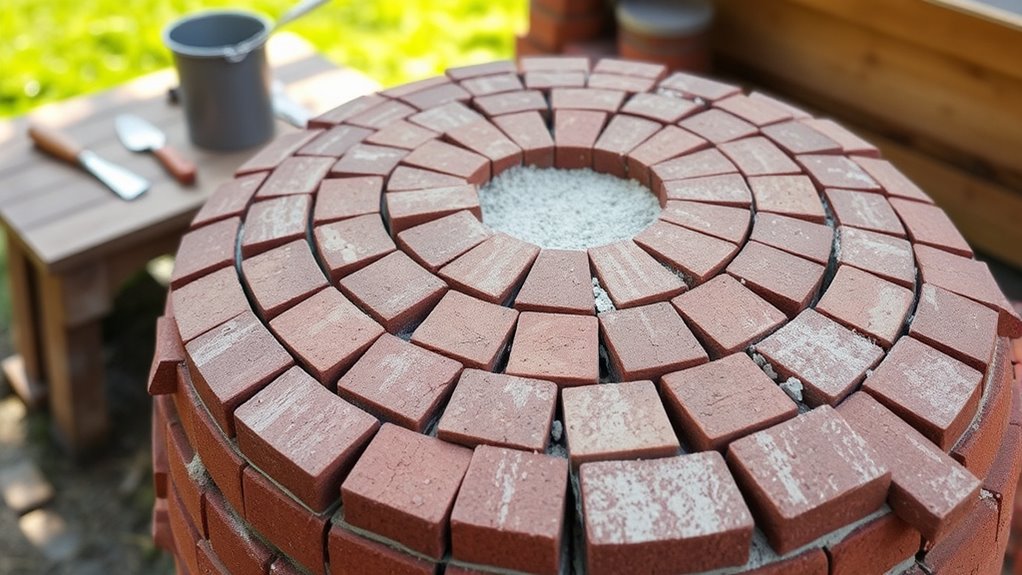
The key to great pizza is not only the oven itself but also what you put inside. Your pizza dough should be prepared with the right ingredients and rested adequately to develop flavor and elasticity. Rolling the dough to the appropriate thickness is indispensable; too thick, and it won’t cook evenly, too thin, and it might burn or tear. Once your dough is ready, you’ll need to manage the heat inside the oven. This is where oven insulation plays a critical role. Proper insulation helps retain heat, making your oven more efficient and capable of reaching higher temperatures faster. You can insulate the dome with ceramic fiber blankets or insulating mortar, which keeps the heat concentrated around the cooking chamber and reduces heat loss. This not only improves cooking performance but also makes your outdoor setup safer and more energy-efficient.
As you build up the layers of your brick oven, be sure to leave a small opening for a chimney or vent that allows smoke to escape while maintaining the heat inside. Once the structure is complete and insulated, you’ll need to cure the oven by gradually heating it over several days. During this process, you should keep the oven at low temperatures, gradually increasing it, to prevent cracks and guarantee even heat distribution. When you’re ready to cook, preheat the oven to the right temperature—typically around 700-900°F for pizza. The insulation you’ve added will help you reach and maintain this heat level, giving your pizza a crispy crust with perfectly melted toppings.
In addition, understanding the science behind psychological resilience can help you stay motivated and persistent as you undertake this complex but rewarding project. With your outdoor brick pizza oven fully functional, you can enjoy making pizza from scratch, experimenting with different dough recipes, and hosting gatherings where everyone appreciates your homemade pies. Proper planning, quality materials, and attention to insulation will make this project a lasting addition to your backyard, delivering authentic pizza experience anytime you crave it.

Fire bricks, Food Grade Woodstove Firebricks, 3000F, Size 9″ x 4-1/2″ x 1-1/4″, 4-Pack, Insulating Fire Bricks, Clay Firebricks Replacement for Wood Stoves, Fireplaces, Fire Pit, Kiln, Pizza Oven
Food Safe: Made of clay, it can be in direct contact with food and can be used in…
As an affiliate, we earn on qualifying purchases.
As an affiliate, we earn on qualifying purchases.
Frequently Asked Questions
What Is the Ideal Location for an Outdoor Pizza Oven?
You should place your outdoor pizza oven in a garden area with good wind protection. Choose a spot that’s easily accessible from your kitchen or patio, ensuring convenience when cooking and serving. Avoid areas prone to strong winds, which can disrupt the cooking process. A shaded corner or a spot near existing structures can provide natural wind barriers, keeping your pizza oven stable and your cooking experience enjoyable.
How Long Does It Take to Build a Brick Pizza Oven?
Building a brick pizza oven takes approximately one to two weeks, depending on your DIY construction skills and the complexity of your design. You’ll save time by choosing suitable materials and preparing a detailed plan. Expect to spend a few days assembling the structure, curing the mortar, and allowing the oven to dry thoroughly. Patience pays off, so take your time to make certain of a sturdy, sizzling, and successful outdoor masterpiece.
What Type of Bricks Are Best Suited for Outdoor Use?
For outdoor use, you should choose fire resistant bricks, as they withstand high temperatures and weather conditions. These bricks guarantee safety and durability for your pizza oven. Additionally, consider aesthetic brick choices that match your outdoor decor, blending functionality with visual appeal. Look for options made from high-quality materials like refractory or clay bricks, which are designed specifically for outdoor cooking structures and can last for years with proper maintenance.
How Do I Maintain and Clean My Brick Pizza Oven?
Cleaning your brick pizza oven is like giving it a fresh breath of air. You should regularly scrape off ashes and food debris after each use, then perform a deep clean every few months. Use a stiff brush and mild detergent for maintenance, avoiding harsh chemicals. Keep an eye on mortar cracks and repair them promptly to prevent damage. Consistent cleaning techniques and maintenance schedules guarantee your oven stays in top shape for delicious pizzas.
Can I Add a Chimney or Vent to Improve Airflow?
Yes, you can add a chimney or vent to improve airflow. Focus on a good chimney design that directs smoke upward and away from your cooking area. Proper vent placement is vital; position it where it encourages efficient draft and heat escape without disrupting airflow. Make sure the chimney is well-sealed and tall enough to prevent smoke backdrafts, making your pizza oven safer and more enjoyable to use.

Lyrufexon Ceramic Fiber Insulation, 60"x24"x1"Thick, 2600F Fireproof Insulation Blanket for Wood Stove Baffle, Fireplace, Pellet Stove, Chimney, Furnace, Boiler, Pizza Ovens and Forge
MORE APPLICATIOONS:Fireproof Insulation for Wood Stove Baffle, Fireplace, Pellet Stove, Chimney, Furnace, Boiler, Pizza Ovens, Forge & Many…
As an affiliate, we earn on qualifying purchases.
As an affiliate, we earn on qualifying purchases.
Conclusion
Building your brick outdoor pizza oven brings boldness, brilliance, and a burst of culinary creativity to your backyard. By blending basic bricks with boundless passion, you craft a charming charm that cheers every chomp and chuckle. So, seize this splendid setup, savor the sizzling success, and share the scrumptious slices. Your skill, spirit, and steadfastness turn simple bricks into a sensational oven, serving up savory, smoky slices that surely satisfy every hungry heart.
Pizza Peel Pizza Pan Set, 7Pcs Pizza Oven Accessories, 12 Inch Metal Paddle (12"x 14") with Foldable Wooden Handle, 2 Pizza Pans, Rocker Cutter, Pizza Server, Oven Mitts, Oil Brush
【Premium Carbon Steel & Food Grade Materials】Professional-grade pizza set made with safe, durable materials: The pizza peel is…
As an affiliate, we earn on qualifying purchases.
As an affiliate, we earn on qualifying purchases.
Gozney Dome Gen 2 Series Pizza Oven Stand, Outdoor Stand with Locking Wheels, Two Shelves for Food Storage
[OVEN COMPATIBILITY]: This Gozney stand is designed for the Dome (Gen 2) and Dome XL (Gen 2) pizza…
As an affiliate, we earn on qualifying purchases.
As an affiliate, we earn on qualifying purchases.