
To build a simple wood shed, start by planning the size and design that matches your outdoor space. Gather weather-resistant materials like treated lumber or metal, along with basic tools such as a saw and drill. Prepare a level foundation, then assemble the frame securely. Add support slats for airflow and a roof to keep logs dry. Finish with weatherproofing and maintenance tips to keep your wood dry and ready for use. Keep going to uncover more easy steps to complete your project.
Key Takeaways
- Plan your firewood capacity and choose weather-resistant materials for durability.
- Prepare a level, well-drained site by clearing debris and adding gravel if needed.
- Build a sturdy frame with treated lumber or metal, ensuring secure joints and proper support.
- Install a roof or cover to protect logs from rain and snow, ensuring proper drainage.
- Finish with weatherproof paint or sealant to preserve wood and simplify maintenance.
Planning Your Firewood Storage Rack

Before building your firewood storage rack, it’s essential to plan carefully to guarantee it meets your needs. First, consider your firewood capacity—think about how much wood you’ll need to store for the season. Do you want a small, compact rack or a larger structure to hold several cords? Next, focus on the aesthetic design; your rack should complement your outdoor space and reflect your style. Decide on a shape, materials, and finish that blend well with your yard or porch. Proper planning ensures you create a functional, attractive rack that’s easy to access and maintain. Additionally, incorporating outdoor decor elements can help your wood shed blend seamlessly into your landscape. It’s also helpful to consider projector technology and how it can influence your setup for outdoor movie nights or gatherings. Taking the time now to visualize and outline your needs helps avoid costly mistakes later and results in a durable, visually appealing storage solution.
Gathering Materials and Tools
To build your firewood storage rack, start by gathering all the necessary materials and tools. You’ll need sturdy wood, and considering alternative wood types can add durability or a unique look. For decorative accents, select elements like decorative trim or paint to customize your rack’s appearance. Gather essential tools such as a saw, drill, measuring tape, level, and screws. If you’re aiming for a more polished look, include brackets or decorative hardware. Make sure to have safety gear like gloves and goggles. Having everything ready before starting guarantees a smooth build process. Remember, choosing quality materials and accents not only enhances functionality but also adds visual appeal, making your DIY wood shed both practical and attractive. Additionally, selecting the right filtration system can help keep your workspace clean and free of dust during construction. Incorporating building plans or detailed diagrams can also streamline your project and ensure correct measurements. Considering the types of wood best suited for outdoor use can improve the longevity of your storage rack. It’s also beneficial to review proper safety procedures to prevent accidents and injuries during construction. Furthermore, adding protective finishes like sealants or stains can help weatherproof your rack and extend its lifespan.
Preparing the Site and Foundation
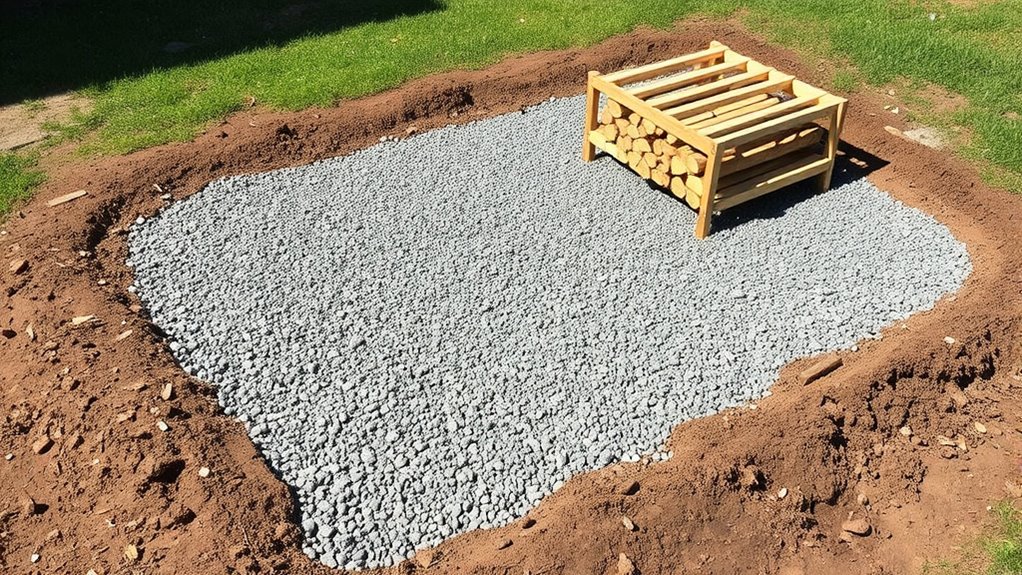
Setting a solid foundation is essential for guaranteeing your firewood storage rack stays stable and lasts over time. Begin by evaluating the site’s soil preparation, removing any grass, weeds, or loose debris. If the ground is uneven, level it out to create a flat surface. Consider drainage considerations to prevent water from pooling around or beneath your rack, which can cause wood rot or instability. If needed, introduce gravel or crushed stone to improve drainage and provide a stable base. Compact the soil or gravel to ensure it won’t shift under the weight of stacked firewood. Taking these steps will create a sturdy, well-drained foundation, giving your storage rack the support it needs to withstand weather and time. Incorporating proper wicking materials can also help maintain consistent moisture levels, protecting your wood from excess humidity and decay. Additionally, understanding building code requirements can help ensure your structure meets local regulations and remains compliant over time. Furthermore, integrating soil stabilization techniques can enhance the durability of your foundation, especially on less stable ground. Using proven foundation reinforcement methods can further improve stability and longevity of your wood shed.
Building the Frame Structure
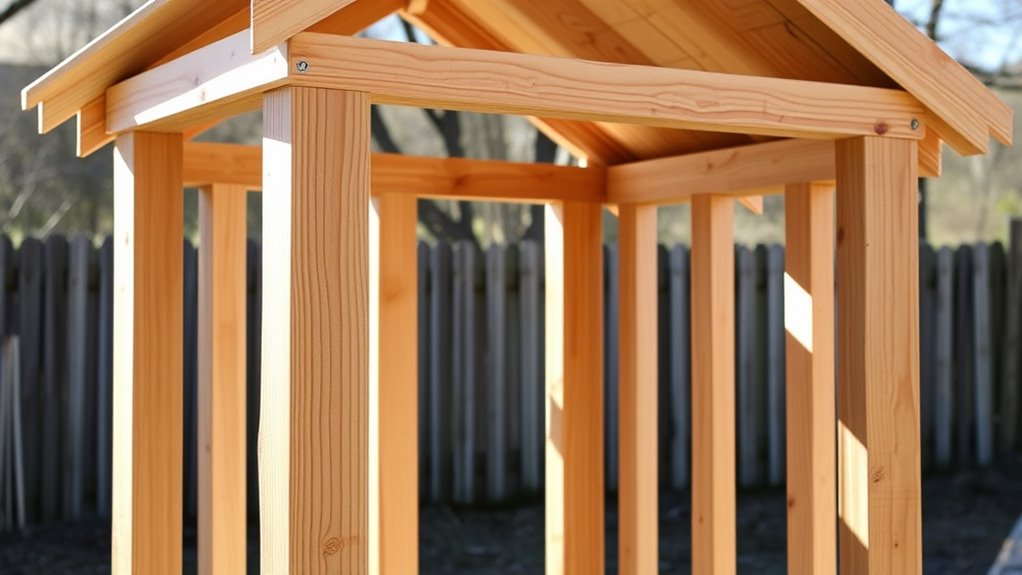
Start by choosing sturdy, weather-resistant materials like treated lumber or metal pipes to guarantee your rack lasts. Next, measure and cut your pieces accurately to match your desired dimensions, making assembly easier. Finally, assemble the framework securely, ensuring all joints are tight and level for stability. Incorporating proper installation techniques will further ensure your DIY wood shed remains safe and durable over time.
Selecting Suitable Materials
Choosing the right materials for building your firewood storage rack’s frame is essential to guarantee durability and stability. You want materials that can withstand weather exposure without rotting or warping, so prioritize wood like cedar or treated lumber for high material durability. These choices resist moisture and pests, ensuring your structure lasts for years. Additionally, consider aesthetic appeal; select materials that complement your yard’s look or match your existing structures. Smooth, well-finished wood not only provides strength but also enhances visual appeal. Avoid cheap or untreated options that may degrade quickly. By choosing quality, weather-resistant materials with good aesthetic qualities, you ensure your wood shed remains sturdy and attractive over time. Self Watering Plant Pots can offer insights into materials that promote plant health and longevity. Moreover, selecting weather-resistant materials is critical for preventing damage caused by UV exposure and moisture, which are important factors in tableware durability and longevity. Ensuring the materials are also resistant to pest damage is vital for maintaining the integrity of your storage structure over the long term. Additionally, considering certifications and endorsements from reputable sources can further verify the quality of your selected materials.
Measuring and Cutting Frame
Once you’ve selected the right materials, you can begin measuring and cutting the frame components. Accurate measuring guarantees your frame fits together properly and maintains stability. Use a tape measure and a square to mark precise measurements on your lumber. Double-check each measurement before cutting to improve measuring accuracy. When it’s time to cut, choose the appropriate cutting tools, such as a handsaw or power saw, based on the material thickness. Keep your tools sharp for cleaner, safer cuts. Follow your marked lines carefully, applying steady pressure. Take your time to ensure each piece is cut accurately, as errors at this stage can affect the overall frame. Proper measuring and cutting set a solid foundation for building your wood shed. Additionally, understanding Louisiana alimony laws can be helpful if your project involves legal considerations or disputes. Incorporating hybrid bike principles, such as choosing the right tools and maintaining accuracy, can also improve the quality of your build. Being aware of potential symptoms of breast cancer can help you stay vigilant about your health during your DIY projects, especially if you’re working over extended periods or in environments that require safety precautions. Paying attention to projector bulb maintenance can ensure your tools operate smoothly and safely throughout your project.
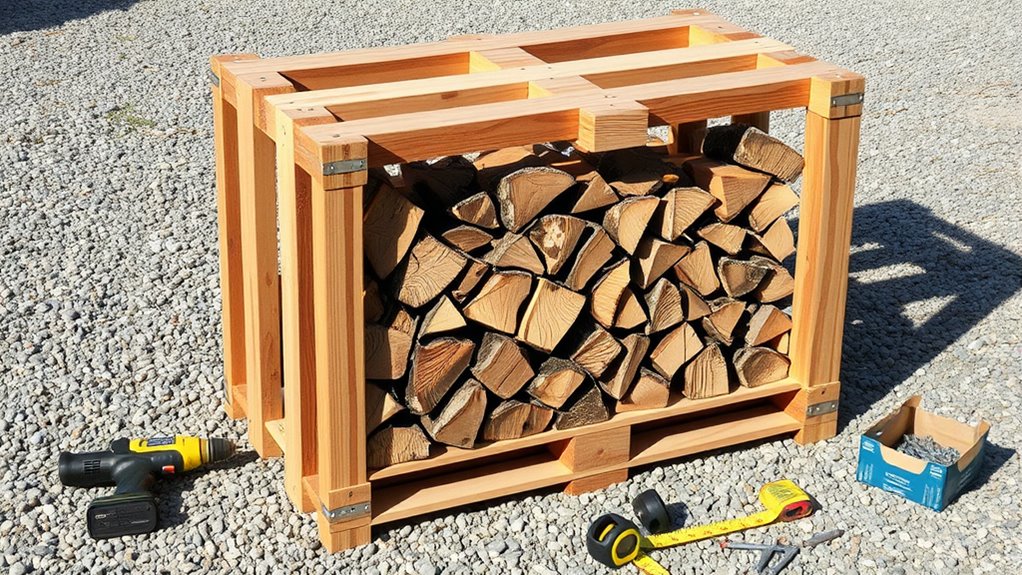
Assembling the Framework
Assembling the framework is a crucial step that brings your project together, so it’s important to work carefully and methodically. Use proper framing techniques to guarantee stability and durability. Start by connecting the side panels to the base using wood joints like screws or nails, making sure they’re flush and square. Reinforce corners with bracing or additional wood joints for extra strength. When attaching the top crossbeam, double-check measurements to keep everything aligned. Take your time to secure each joint firmly, avoiding gaps or misalignments. This step creates the skeleton of your wood shed, so precision matters. Proper framing techniques will ensure your firewood rack is sturdy, safe, and built to last. Paying attention to structural integrity during assembly will help prevent future issues and extend the lifespan of your storage solution. Additionally, inspecting your work for stability at each stage can help identify potential weaknesses early on. Incorporating sound construction practices can further enhance the overall durability of your project. Remember to consider the family background of your materials and tools to ensure you are using the most appropriate resources for a durable build. Using correct tools during assembly will also improve the quality and safety of your structure.
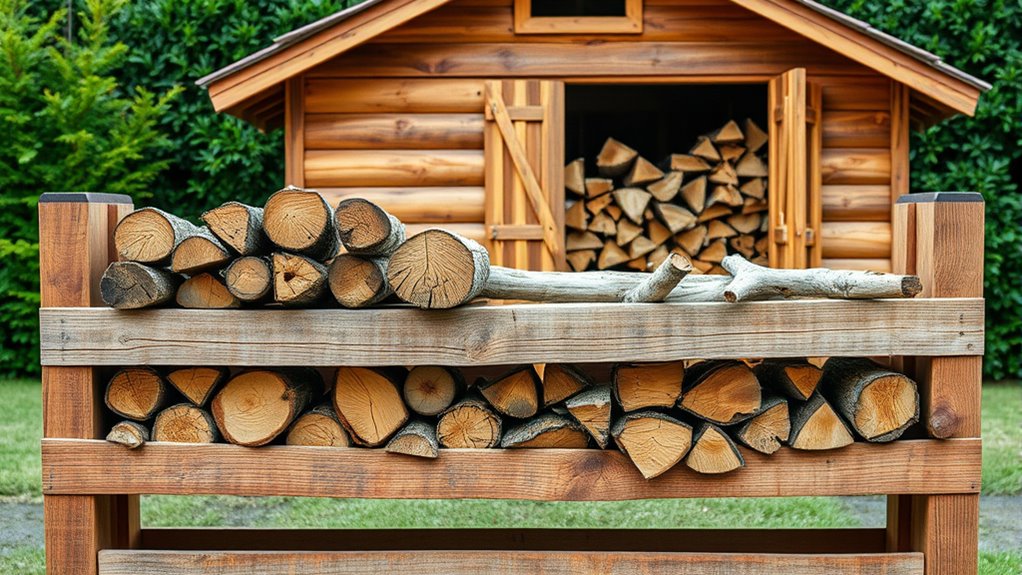
Adding the Support Slats or Shelves
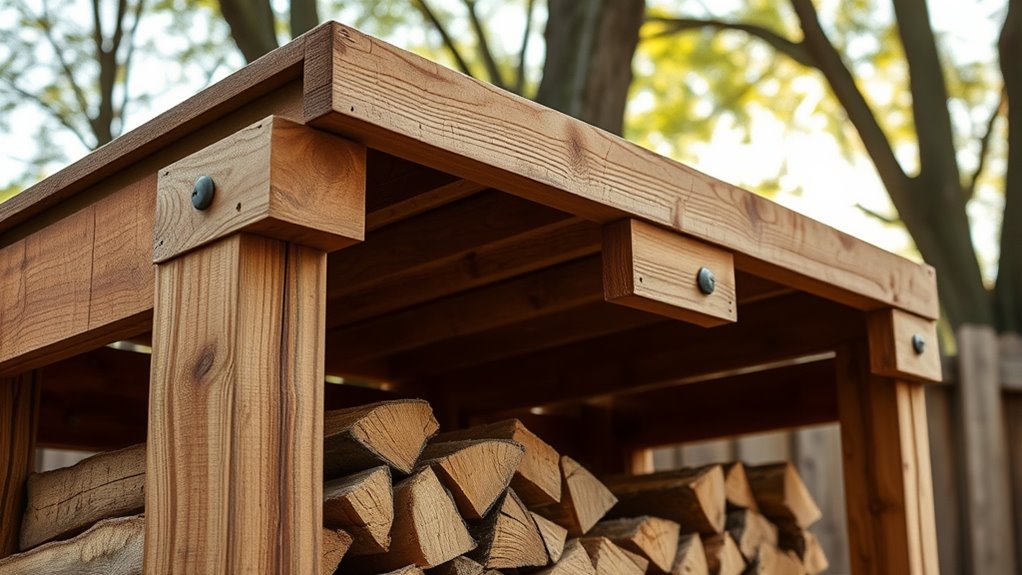
Adding support slats or shelves is a crucial step to guarantee your firewood rack is sturdy and functional. Support slats provide a stable base for stacking logs and help distribute weight evenly. When doing shelf installation, ensure the slats are spaced appropriately to allow air circulation and prevent moisture buildup. Use sturdy materials like treated wood or metal for durability. Secure each support slat firmly to the framework with screws or brackets, making sure they’re level and evenly spaced. Proper support slats not only make stacking easier but also extend the life of your firewood rack by keeping logs off the ground and protected from moisture. Take your time during this step to ensure your shelves are strong and secure for long-lasting use.
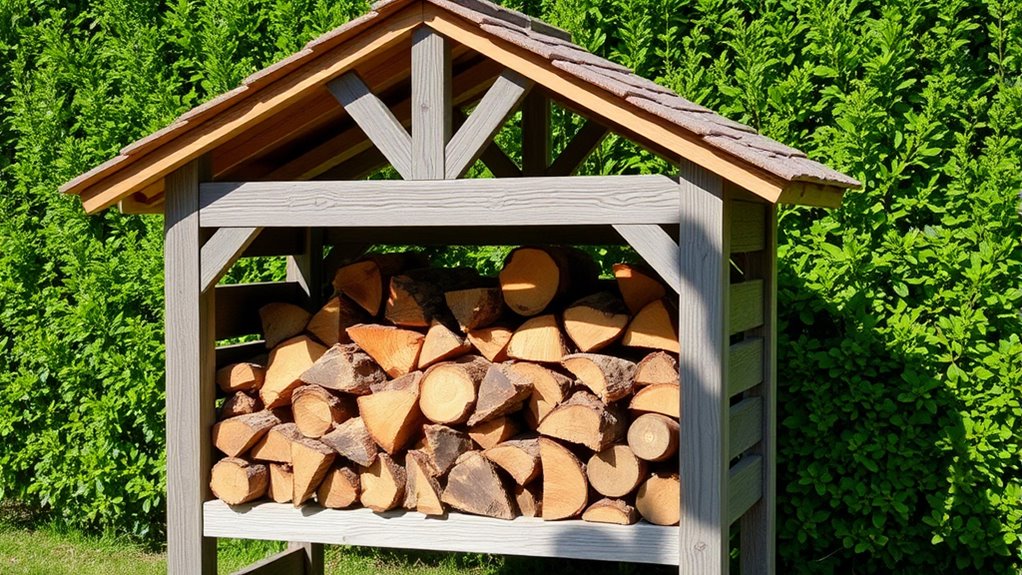
Installing the Roof or Covering
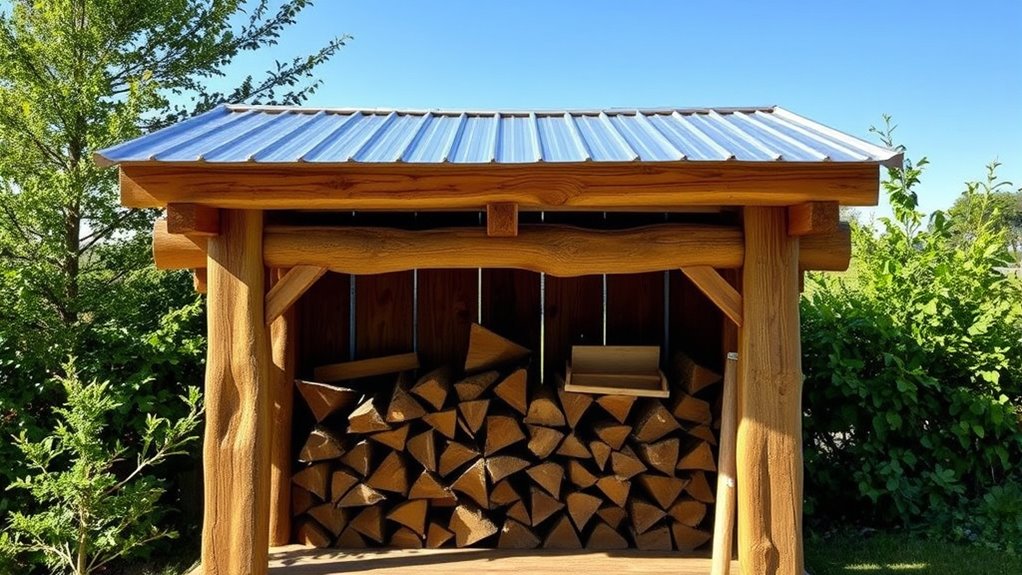
Installing a roof or covering for your firewood rack is essential to protect your logs from rain, snow, and moisture. A proper roof installation guarantees your firewood stays dry and ready for use. Choose a rainproof covering that fits securely over your rack, allowing proper drainage. When installing, angle the roof to direct water away and prevent pooling. Use sturdy materials like metal or shingles for durability. Ensuring the roof is weatherproof helps extend the lifespan of your firewood and maintains its quality.
Finishing Touches and Weatherproofing
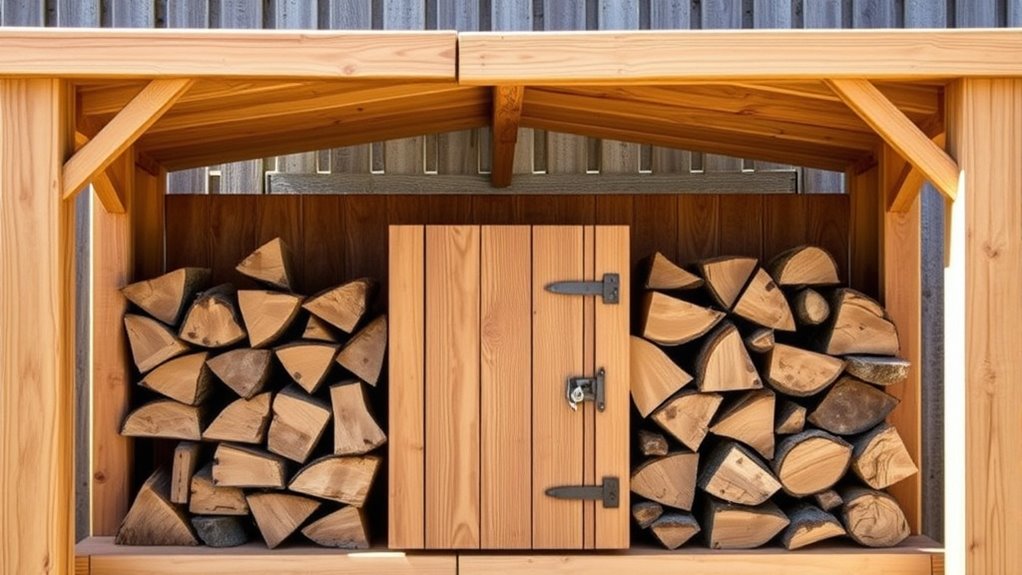
Once your firewood rack is assembled and the roof is in place, it’s crucial to focus on finishing touches and weatherproofing to guarantee your logs stay dry and protected over time. Start by applying a paint finish to any exposed wood surfaces, which helps resist moisture and UV damage. Choose a weather-resistant paint suitable for outdoor use and apply it evenly, allowing proper drying time. Afterward, consider sealing all joints, seams, and wood surfaces with a high-quality sealant to prevent water infiltration. Sealant application ensures your rack remains sturdy and dry, even during heavy rain or snow. Regularly inspect these protective layers and reapply as needed to extend the lifespan of your DIY wood shed. Proper finishing and weatherproofing keep your firewood dry and ready for use.
Tips for Maintaining Your Wood Shed
Maintaining your wood shed regularly guarantees it continues to protect your firewood effectively. To keep it in top shape, follow these tips:
- Conduct seasonal cleaning to remove debris and dirt, preventing mold and decay.
- Check for any signs of damage or leaks and repair them promptly to maintain weatherproofing.
- Practice pest prevention by sealing gaps and removing wood scraps or nests that attract insects.
- Ensure proper ventilation to reduce moisture buildup, which discourages pests and mold growth.
Frequently Asked Questions
How Do I Ensure Proper Ventilation for My Firewood Rack?
To guarantee proper ventilation for your firewood rack, focus on ventilation tips like spacing the logs correctly and choosing an open or slatted design. Improve airflow enhancement by elevating the rack on blocks or using a breathable cover. Avoid enclosed spaces that trap moisture. Adequate airflow helps prevent mold and rot, keeping your firewood dry and ready to burn. Regularly check and adjust ventilation to maintain ideal conditions.
What Are the Best Types of Wood for Building the Shed?
Choosing the right types of wood is like selecting sturdy bricks for a fortress—your shed needs durability. Hardwoods like cedar and oak stand out because of their high wood durability and resistance to decay. I built a shed with cedar, and it’s still strong after years. Opt for treated lumber or naturally rot-resistant woods, ensuring your firewood storage stays protected from the elements and lasts for years.
How Can I Prevent Pests From Infesting Stored Firewood?
To prevent pests from infesting your stored firewood, you should practice pest control by regularly inspecting the wood and keeping it dry. Using wood treatment products can also deter pests. Additionally, elevate your firewood off the ground and cover it with a breathable tarp to reduce moisture and pest access. Proper storage minimizes pest problems, ensuring your firewood stays clean and ready for use.
What Is the Ideal Size for a Firewood Storage Rack?
When choosing the ideal size for your firewood storage rack, consider your typical firewood needs and available space. You want enough room for effective firewood stacking while keeping the rack manageable. Aim for a rack height of about 4-5 feet to ensure easy access and proper airflow. A length of 4-6 feet usually suffices for most households. Adapt the size based on your storage habits and space constraints.
How Often Should I Inspect and Maintain the Shed?
You should inspect and maintain your shed regularly, ideally seasonally, to keep it in top shape. Conduct seasonal inspections to check for damage, leaks, and pest signs, especially pest prevention. Clean out debris, ensure good airflow, and reseal any cracks. Consistent maintenance helps prevent pests and prolongs the shed’s lifespan, making certain your firewood stays dry and protected throughout the year.
Conclusion
Now that you’ve built your own firewood storage rack, you’ll enjoy easy access and dry wood all season long. Imagine the satisfaction of a sturdy, customized shed standing tall in your yard—are you ready to tackle this rewarding project and keep your firewood organized for years to come? With your new DIY skills, you’ll turn a simple design into a cozy, functional storage solution that saves you money and adds value to your home.